> For the complete documentation index, see [llms.txt](https://docs.rtlcopymemory.com/llms.txt). Markdown versions of documentation pages are available by appending `.md` to page URLs; this page is available as [Markdown](https://docs.rtlcopymemory.com/using-web-proxies.md).
# Using Web Proxies
## Burp Intruder
### Target
As usual, we'll start up Burp and its pre-configured browser and then visit the web application from the exercise at the end of this section. Once we do, we can go to the Proxy History, locate our request, then right-click on the request and select `Send to Intruder`, or use the shortcut \[`CTRL+I`] to send it to `Intruder`.
We can then go to `Intruder` by clicking on its tab or with the shortcut \[`CTRL+SHIFT+I`], which takes us right to `Burp Intruder`:
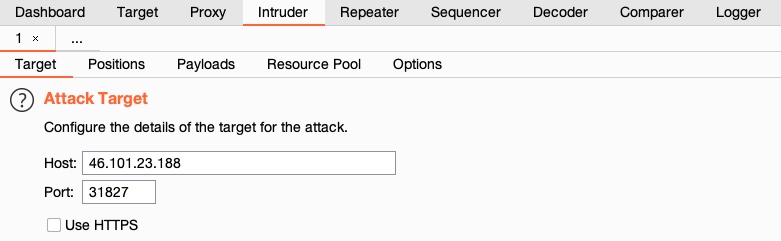
On the first tab, '`Target`', we see the details of the target we will be fuzzing, which is fed from the request we sent to `Intruder`.
***
### Positions
The second tab, '`Positions`', is where we place the payload position pointer, which is the point where words from our wordlist will be placed and iterated over. We will be demonstrating how to fuzz web directories, which is similar to what's done by tools like `ffuf` or `gobuster`.
To check whether a web directory exists, our fuzzing should be in '`GET /DIRECTORY/`', such that existing pages would return `200 OK`, otherwise we'd get `404 NOT FOUND`. So, we will need to select `DIRECTORY` as the payload position, by either wrapping it with `§` or by selecting the word `DIRECTORY` and clicking on the `Add §` button:
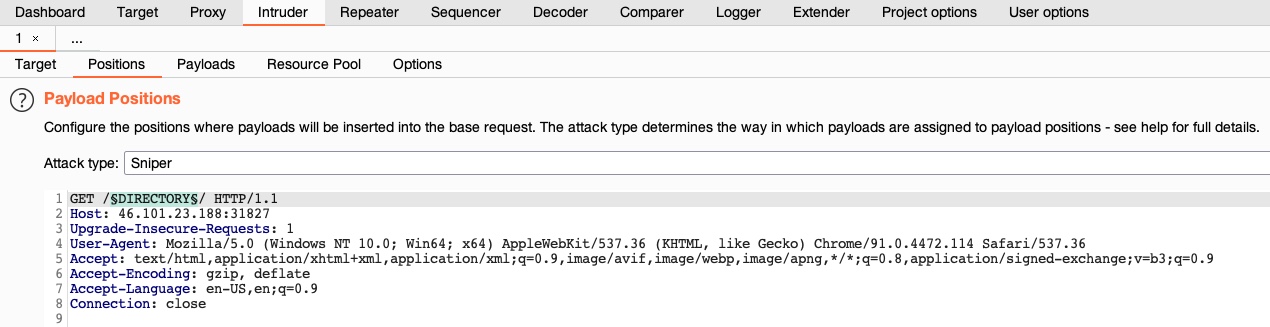
Tip: the `DIRECTORY` in this case is the pointer's name, which can be anything, and can be used to refer to each pointer, in case we are using more than position with different wordlists for each.
The final thing to select in the target tab is the `Attack Type`. The attack type defines how many payload pointers are used and determines which payload is assigned to which position. For simplicity, we'll stick to the first type, `Sniper`, which uses only one position. Try clicking on the `?` at the top of the window to read more about attack types, or check out this [link](https://portswigger.net/burp/documentation/desktop/tools/intruder/positions#attack-type).
Note: Be sure to leave the extra two lines at the end of the request, otherwise we may get an error response from the server.
***
### Payloads
On the third tab, '`Payloads`', we get to choose and customize our payloads/wordlists. This payload/wordlist is what would be iterated over, and each element/line of it would be placed and tested one by one in the Payload Position we chose earlier. There are four main things we need to configure:
* Payload Sets
* Payload Options
* Payload Processing
* Payload Encoding
**Payload Sets**
The first thing we must configure is the `Payload Set`. The payload set identifies the Payload number, depending on the attack type and number of Payloads we used in the Payload Position Pointers:

In this case, we only have one Payload Set, as we chose the '`Sniper`' Attack type with only one payload position. If we have chosen the '`Cluster Bomb`' attack type, for example, and added several payload positions, we would get more payload sets to choose from and choose different options for each. In our case, we'll select `1` for the payload set.
Next, we need to select the `Payload Type`, which is the type of payloads/wordlists we will be using. Burp provides a variety of Payload Types, each of which acts in a certain way. For example:
* `Simple List`: The basic and most fundamental type. We provide a wordlist, and Intruder iterates over each line in it.
* `Runtime file`: Similar to `Simple List`, but loads line-by-line as the scan runs to avoid excessive memory usage by Burp.
* `Character Substitution`: Lets us specify a list of characters and their replacements, and Burp Intruder tries all potential permutations.
There are many other Payload Types, each with its own options, and many of which can build custom wordlists for each attack. Try clicking on the `?` next to `Payload Sets`, and then click on `Payload Type`, to learn more about each Payload Type. In our case, we'll be going with a basic `Simple List`.
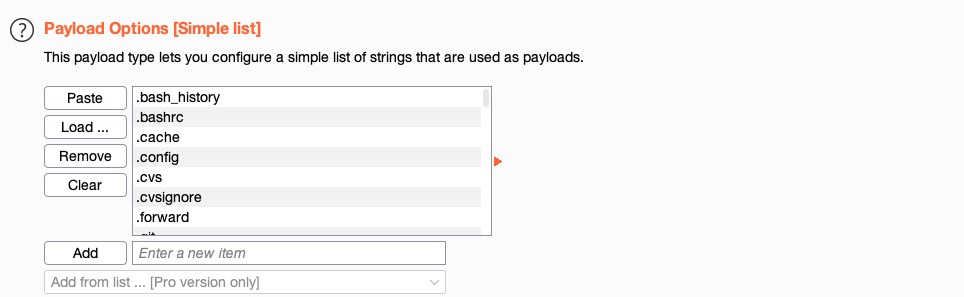
**Payload Options**
Next, we must specify the Payload Options, which is different for each Payload Type we select in `Payload Sets`. For a `Simple List`, we have to create or load a wordlist. To do so, we can input each item manually by clicking `Add`, which would build our wordlist on the fly. The other more common option is to click on `Load`, and then select a file to load into Burp Intruder.
We will select `/opt/useful/seclists/Discovery/Web-Content/common.txt` as our wordlist. We can see that Burp Intruder loads all lines of our wordlist into the Payload Options table:
We can add another wordlist or manually add a few items, and they would be appended to the same list of items. We can use this to combine multiple wordlists or create customized wordlists. In Burp Pro, we also can select from a list of existing wordlists contained within Burp by choosing from the `Add from list` menu option.
Tip: In case you wanted to use a very large wordlist, it's best to use `Runtime file` as the Payload Type instead of `Simple List`, so that Burp Intruder won't have to load the entire wordlist in advance, which may throttle memory usage.
**Payload Processing**
Another option we can apply is `Payload Processing`, which allows us to determine fuzzing rules over the loaded wordlist. For example, if we wanted to add an extension after our payload item, or if we wanted to filter the wordlist based on specific criteria, we can do so with payload processing.
Let's try adding a rule that skips any lines that start with a `.` (as shown in the wordlist screenshot earlier). We can do that by clicking on the `Add` button and then selecting `Skip if matches regex`, which allows us to provide a regex pattern for items we want to skip. Then, we can provide a regex pattern that matches lines starting with `.`, which is: `^\..*$`:
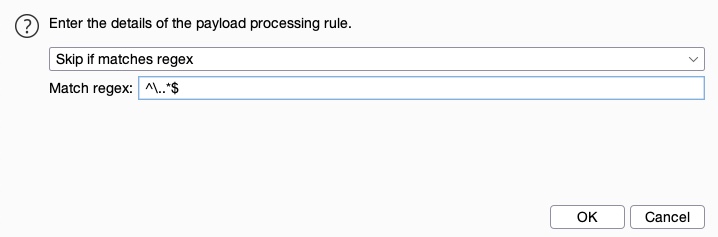
We can see that our rule gets added and enabled: 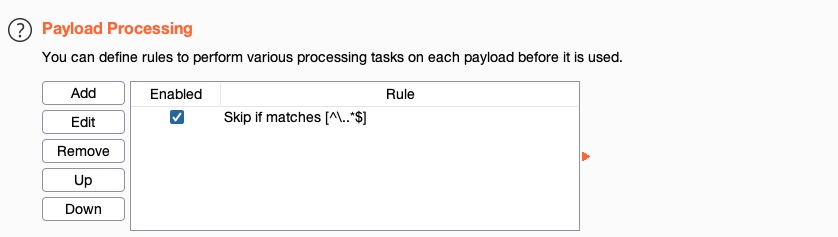
**Payload Encoding**
The fourth and final option we can apply is `Payload Encoding`, enabling us to enable or disable Payload URL-encoding.

We'll leave it enabled.
***
### Options
Finally, we can customize our attack options from the `Options` tab. There are many options we can customize (or leave at default) for our attack. For example, we can set the number of `retried on failure` and `pause before retry` to 0.
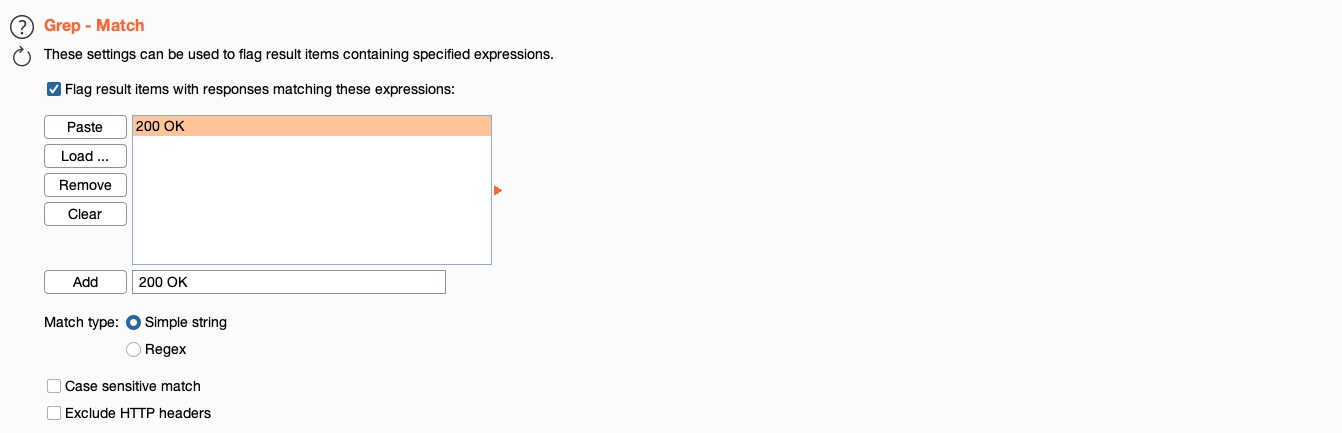
Another useful option is the `Grep - Match`, which enables us to flag specific requests depending on their responses. As we are fuzzing web directories, we are only interested in responses with HTTP code `200 OK`. So, we'll first enable it and then click `Clear` to clear the current list. After that, we can type `200 OK` to match any requests with this string and click `Add` to add the new rule. Finally, we'll also disable `Exclude HTTP Headers`, as what we are looking for is in the HTTP header:
{% hint style="danger" %}
Most of the tool UI has been moved to the side, if you can't find the options check there
{% endhint %}
We may also utilize the `Grep - Extract` option, which is useful if the HTTP responses are lengthy, and we're only interested in a certain part of the response. So, this helps us in only showing a specific part of the response. We are only looking for responses with HTTP Code `200 OK`, regardless of their content, so we will not opt for this option.
Try other `Intruder` options, and use Burp help by clicking on `?` next to each one to learn more about each option.
Note: We may also use the `Resource Pool` tab to specify how much network resources Intruder will use, which may be useful for very large attacks. For our example, we'll leave it at its default values.
***
### Attack
Now that everything is properly set up, we can click on the `Start Attack` button and wait for our attack to finish. Once again, in the free `Community Version`, these attacks would be very slow and take a considerable amount of time for longer wordlists.
The first thing we will notice is that all lines starting with `.` were skipped, and we directly started with the lines after them:

We can also see the `200 OK` column, which shows requests that match the `200 OK` grep value we specified in the Options tab. We can click on it to sort by it, such that we'll have matching results at the top. Otherwise, we can sort by `status` or by `Length`. Once our scan is done, we see that we get one hit `/admin`:

We may now manually visit the page ``, to make sure that it does exist.
Similarly, we can use `Burp Intruder` to do any type of web fuzzing and brute-forcing, including brute forcing for passwords, or fuzzing for certain PHP parameters, and so on. We can even use `Intruder` to perform password spraying against applications that use Active Directory (AD) authentication such as Outlook Web Access (OWA), SSL VPN portals, Remote Desktop Services (RDS), Citrix, custom web applications that use AD authentication, and more. However, as the free version of `Intruder` is extremely throttled, in the next section, we will see ZAP's fuzzer and its various options, which do not have a paid tier.
## ZAP Fuzzer
***
ZAP's Fuzzer is called (`ZAP Fuzzer`). It can be very powerful for fuzzing various web end-points, though it is missing some of the features provided by Burp Intruder. ZAP Fuzzer, however, does not throttle the fuzzing speed, which makes it much more useful than Burp's free Intruder.
In this section, we will try to replicate what we did in the previous section using ZAP Fuzzer to have an "apples to apples" comparison and decide which one we like best.
***
### Fuzz
To start our fuzzing, we will visit the URL from the exercise at the end of this section to capture a sample request. As we will be fuzzing for directories, let's visit `` to place our fuzzing location on `test` later on. Once we locate our request in the proxy history, we will right-click on it and select (`Attack>Fuzz`), which will open the `Fuzzer` window:

The main options we need to configure for our Fuzzer attack are:
* Fuzz Location
* Payloads
* Processors
* Options
Let's try to configure them for our web directory fuzzing attack.
***
### Locations
The `Fuzz Location` is very similar to `Intruder Payload Position`, where our payloads will be placed. To place our location on a certain word, we can select it and click on the `Add` button on the right pane. So, let's select `test` and click on `Add`:
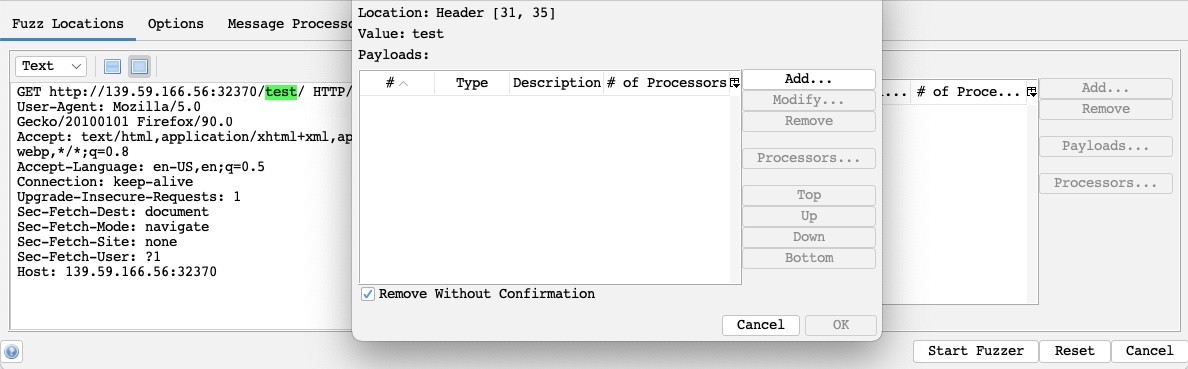
As we can see, this placed a `green` marker on our selected location and opened the `Payloads` window for us to configure our attack payloads.
***
### Payloads
The attack payloads in ZAP's Fuzzer are similar in concept to Intruder's Payloads, though they are not as advanced as Intruder's. We can click on the `Add` button to add our payloads and select from 8 different payload types. The following are some of them:
* `File`: This allows us to select a payload wordlist from a file.
* `File Fuzzers`: This allows us to select wordlists from built-in databases of wordlists.
* `Numberzz`: Generates sequences of numbers with custom increments.
One of the advantages of ZAP Fuzzer is having built-in wordlists we can choose from so that we do not have to provide our own wordlist. More databases can be installed from the ZAP Marketplace, as we will see in a later section. So, we can select `File Fuzzers` as the `Type`, and then we will select the first wordlist from `dirbuster`:
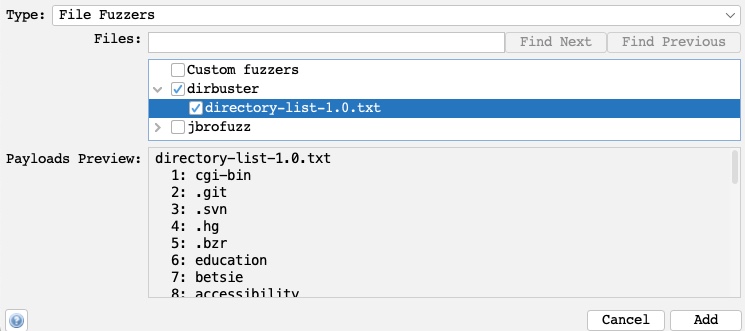
Once we click the `Add` button, our payload wordlist will get added, and we can examine it with the `Modify` button.
***
### Processors
We may also want to perform some processing on each word in our payload wordlist. The following are some of the payload processors we can use:
* Base64 Decode/Encode
* MD5 Hash
* Postfix String
* Prefix String
* SHA-1/256/512 Hash
* URL Decode/Encode
* Script
As we can see, we have a variety of encoders and hashing algorithms to select from. We can also add a custom string before the payload with `Prefix String` or a custom string with `Postfix String`. Finally, the `Script` type allows us to select a custom script that we built and run on every payload before using it in the attack.
We will select the `URL Encode` processor for our exercise to ensure that our payload gets properly encoded and avoid server errors if our payload contains any special characters. We can click on the `Generate Preview` button to preview how our final payload will look in the request:
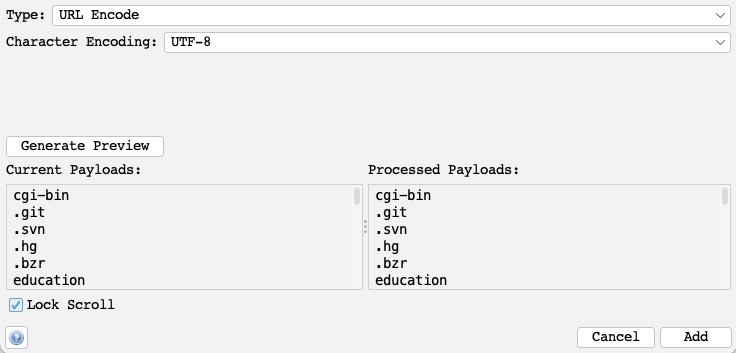
Once that's done, we can click on `Add` to add the processor and click on `Ok` in the processors and payloads windows to close them.
***
### Options
Finally, we can set a few options for our fuzzers, similar to what we did with Burp Intruder. For example, we can set the `Concurrent threads per scan` to `20`, so our scan runs very quickly:
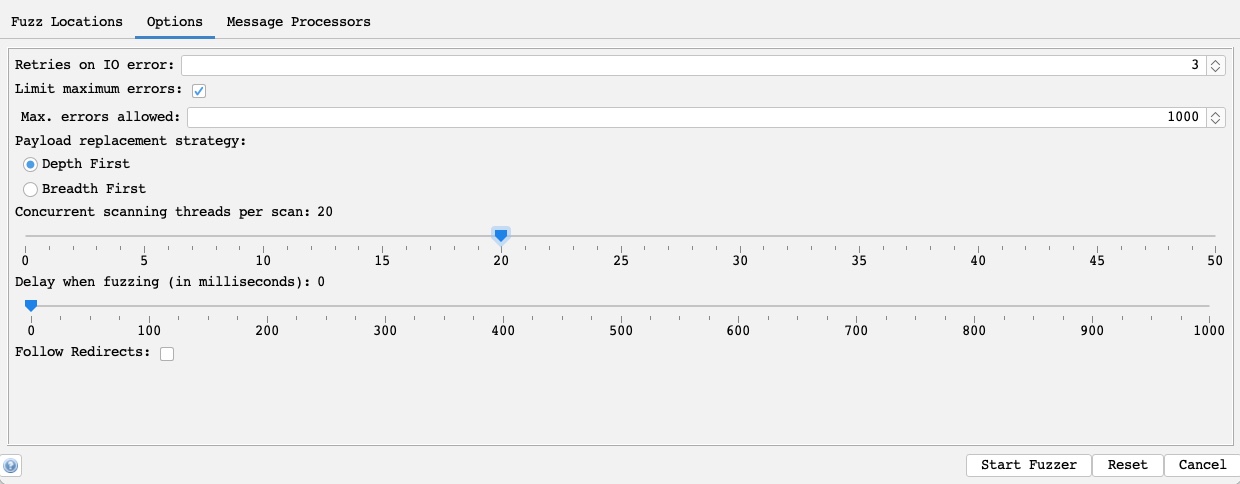
The number of threads we set may be limited by how much computer processing power we want to use or how many connections the server allows us to establish.
We may also choose to run through the payloads `Depth first`, which would attempt all words from the wordlist on a single payload position before moving to the next (e.g., try all passwords for a single user before brute-forcing the following user). We could also use `Breadth first`, which would run every word from the wordlist on all payload positions before moving to the next word (e.g., attempt every password for all users before moving to the following password).
***
### Start
With all of our options configured, we can finally click on the `Start Fuzzer` button to start our attack. Once our attack is started, we can sort the results by the `Response` code, as we are only interested in responses with code `200`:

As we can see, we got one hit with code `200` with the `skills` payload, meaning that the `/skills/` directory exists on the server and is accessible. We can click on the request in the results window to view its details: 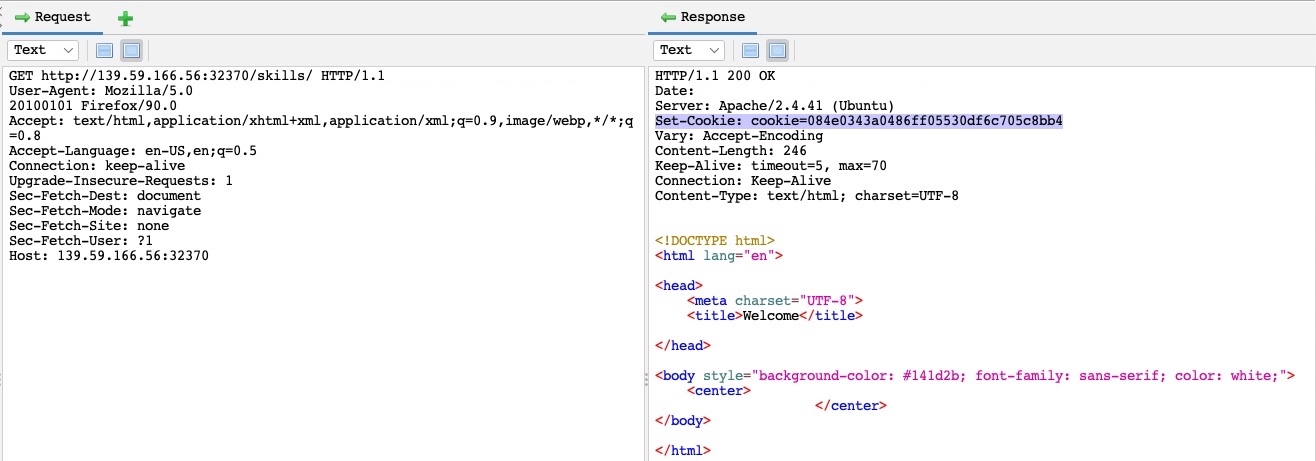
We can see from the response that this page is indeed accessible by us. There are other fields that may indicate a successful hit depending on the attack scenario, like `Size Resp. Body` which may indicate that we got a different page if its size was different than other responses, or `RTT` for attacks like `time-based SQL injections`, which are detected by a time delay in the server response.
***
## Burp Scanner
An essential feature of web proxy tools is their web scanners. Burp Suite comes with `Burp Scanner`, a powerful scanner for various types of web vulnerabilities, using a `Crawler` for building the website structure, and `Scanner` for passive and active scanning.
Burp Scanner is a Pro-Only feature, and it is not available in the free Community version of Burp Suite. However, given the wide scope that Burp Scanner covers and the advanced features it includes, it makes it an enterprise-level tool, and as such, it is expected to be a paid feature.
### Target Scope
To start a scan in Burp Suite, we have the following options:
1. Start scan on a specific request from Proxy History
2. Start a new scan on a set of targets
3. Start a scan on items in-scope
To start a scan on a specific request from Proxy History, we can right-click on it once we locate it in the history, and then select `Scan` to be able to configure the scan before we run it, or select `Passive/Active Scan` to quickly start a scan with the default configurations:

We may also click on the `New Scan` button on the `Dashboard` tab, which would open the `New Scan` configuration window to configure a scan on a set of custom targets. Instead of creating a custom scan from scratch, let's see how we can utilize the scope to properly define what's included/excluded from our scans using the `Target Scope`. The `Target Scope` can be utilized with all Burp features to define a custom set of targets that will be processed. Burp also allows us to limit Burp to in-scope items to save resources by ignoring any out-of-scope URLs.
Note: We will be scanning the web application from the exercise found at the end of the next section. If you obtain a license to use Burp Pro, you may spawn the target at the end of the next section and follow along here.
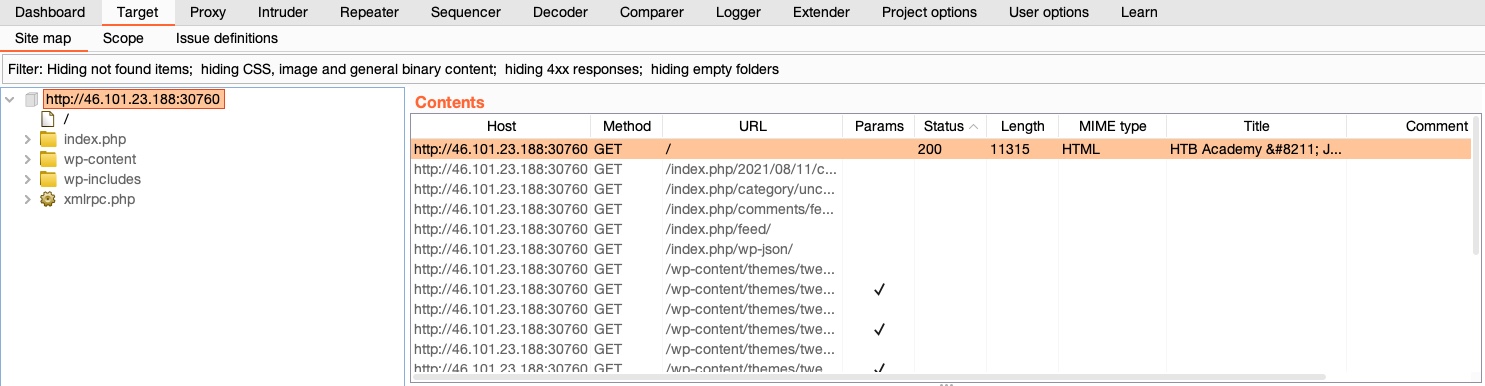
If we go to (`Target>Site map`), it will show a listing of all directories and files burp has detected in various requests that went through its proxy:
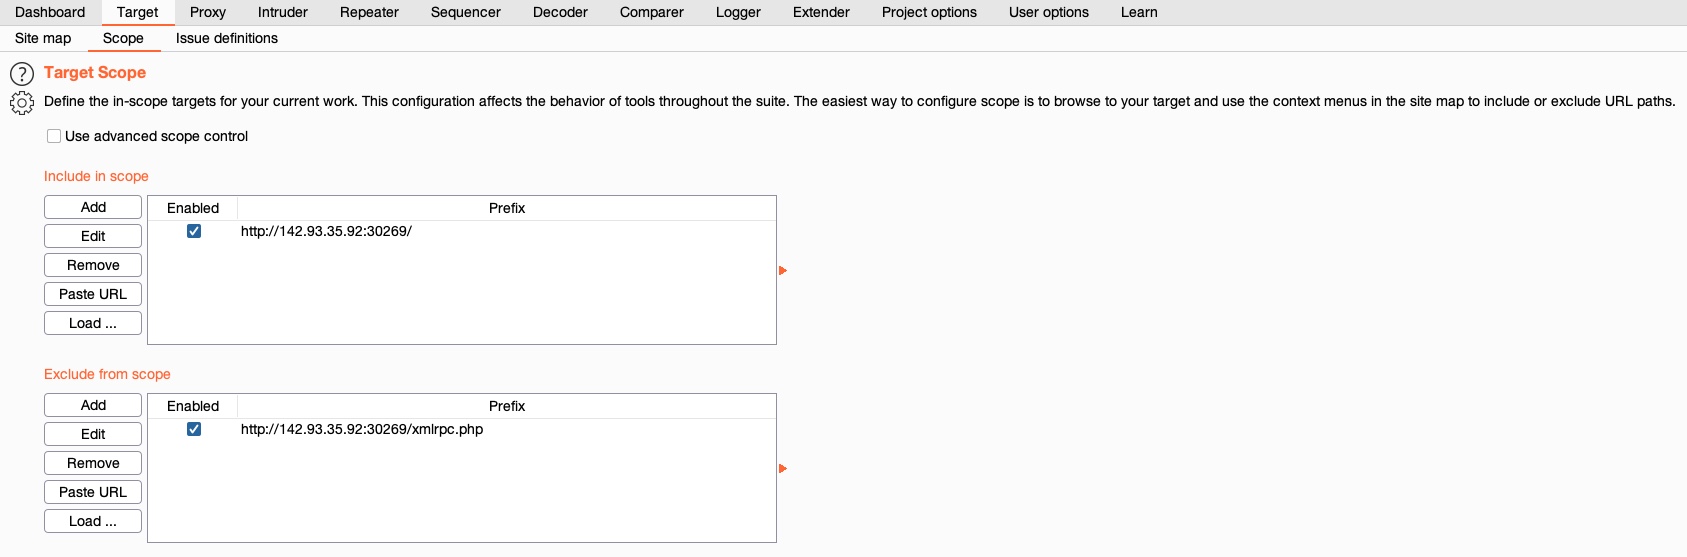
To add an item to our scope, we can right-click on it and select `Add to scope`:

Note: When you add the first item to your scope, Burp will give you the option to restrict its features to in-scope items only, and ignore any out-of-scope items.
We may also need to exclude a few items from scope if scanning them may be dangerous or may end our session 'like a logout function'. To exclude an item from our scope, we can right-click on any in-scope item and select `Remove from scope`. Finally, we can go to (`Target>Scope`) to view the details of our scope. Here, we may also add/remove other items and use advanced scope control to specify regex patterns to be included/excluded.
***
### Crawler
Once we have our scope ready, we can go to the `Dashboard` tab and click on `New Scan` to configure our scan, which would be automatically populated with our in-scope items:
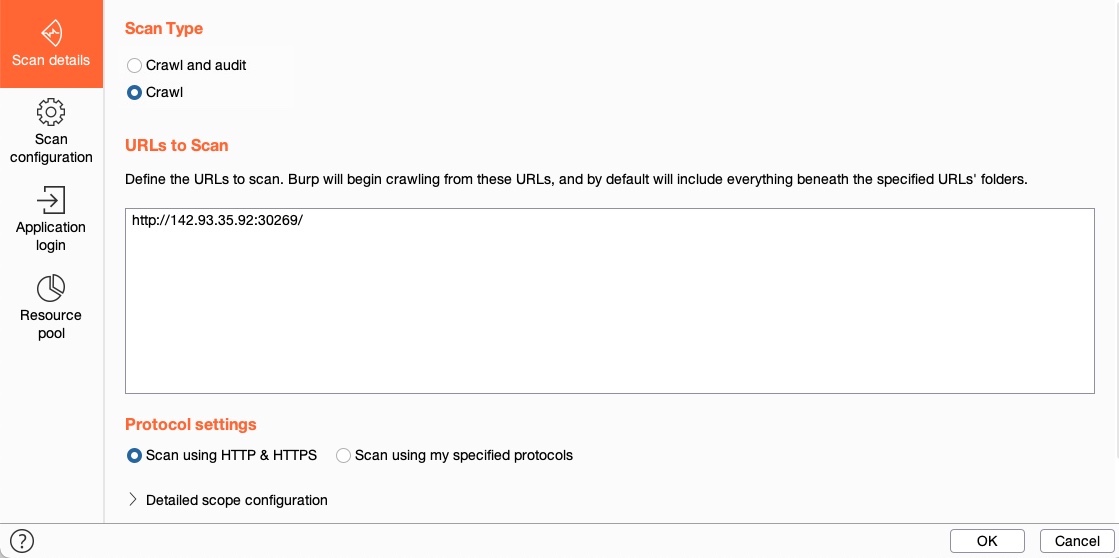
We see that Burp gives us two scanning options: `Crawl and Audit` and `Crawl`. A Web Crawler navigates a website by accessing any links found in its pages, accessing any forms, and examining any requests it makes to build a comprehensive map of the website. In the end, Burp Scanner presents us with a map of the target, showing all publicly accessible data in a single place. If we select `Crawl and Audit`, Burp will run its scanner after its Crawler (as we will see later).
Note: A Crawl scan only follows and maps links found in the page we specified, and any pages found on it. It does not perform a fuzzing scan to identify pages that are never referenced, like what dirbuster or ffuf would do. This can be done with Burp Intruder or Content Discovery, and then added to scope, if needed.
Let us select `Crawl` as a start and go to the `Scan configuration` tab to configure our scan. From here, we may choose to click on `New` to build a custom configuration, which would allow us to set the configurations like the crawling speed or limit, whether Burp will attempt to log in to any login forms, and a few other configurations. For the sake of simplicity, we will click on the `Select from library` button, which gives us a few preset configurations we can pick from (or custom configurations we previously defined):
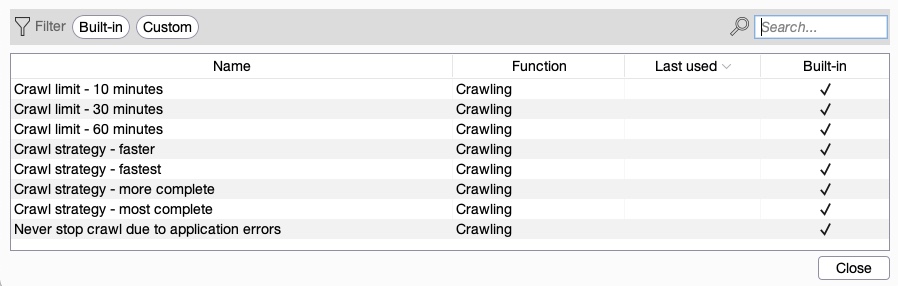
We will select the `Crawl strategy - fastest` option and continue to the `Application login` tab. In this tab, we can add a set of credentials for Burp to attempt in any Login forms/fields it can find. We may also record a set of steps by performing a manual login in the pre-configured browser, such that Burp knows what steps to follow to gain a login session. This can be essential if we were running our scan using an authenticated user, which would allow us to cover parts of the web application that Burp may otherwise not have access to. As we do not have any credentials, we'll leave it empty.
With that, we can click on the `Ok` button to start our Crawl scan. Once our scan starts, we can see its progress in the `Dashboard` tab under `Tasks`:

We may also click on the `View details` button on the tasks to see more details about the running scan or click on the gear icon to customize our scan configurations further. Finally, once our scan is complete, we'll see `Crawl Finished` in the task info, and then we can go back to (`Target>Site map`) to view the updated site map:

***
### Passive Scanner
Now that the site map is fully built, we may select to scan this target for potential vulnerabilities. When we choose the `Crawl and Audit` option in the `New Scan` dialog, Burp will perform two types of scans: A `Passive Vulnerability Scan` and an `Active Vulnerability Scan`.
Unlike an Active Scan, a Passive Scan does not send any new requests but analyzes the source of pages already visited in the target/scope and then tries to identify `potential` vulnerabilities. This is very useful for a quick analysis of a specific target, like missing HTML tags or potential DOM-based XSS vulnerabilities. However, without sending any requests to test and verify these vulnerabilities, a Passive Scan can only suggest a list of potential vulnerabilities. Still, Burp Passive Scanner does provide a level of `Confidence` for each identified vulnerability, which is also helpful for prioritizing potential vulnerabilities.
Let's start by trying to perform a Passive Scan only. To do so, we can once again select the target in (`Target>Site map`) or a request in Burp Proxy History, then right-click on it and select `Do passive scan` or `Passively scan this target`. The Passive Scan will start running, and its task can be seen in the `Dashboard` tab as well. Once the scan finishes, we can click on `View Details` to review identified vulnerabilities and then select the `Issue activity` tab:

Alternately, we can view all identified issues in the `Issue activity` pane on the `Dashboard` tab. As we can see, it shows the list of potential vulnerabilities, their severity, and their confidence. Usually, we want to look for vulnerabilities with `High` severity and `Certain` confidence. However, we should include all levels of severity and confidence for very sensitive web applications, with a special focus on `High` severity and `Confident/Firm` confidence.
***
### Active Scanner
We finally reach the most powerful part of Burp Scanner, which is its Active Vulnerability Scanner. An active scan runs a more comprehensive scan than a Passive Scan, as follows:
1. It starts by running a Crawl and a web fuzzer (like dirbuster/ffuf) to identify all possible pages
2. It runs a Passive Scan on all identified pages
3. It checks each of the identified vulnerabilities from the Passive Scan and sends requests to verify them
4. It performs a JavaScript analysis to identify further potential vulnerabilities
5. It fuzzes various identified insertion points and parameters to look for common vulnerabilities like XSS, Command Injection, SQL Injection, and other common web vulnerabilities
The Burp Active scanner is considered one of the best tools in that field and is frequently updated to scan for newly identified web vulnerabilities by the Burp research team.
We can start an Active Scan similarly to how we began a Passive Scan by selecting the `Do active scan` from the right-click menu on a request in Burp Proxy History. Alternatively, we can run a scan on our scope with the `New Scan` button in the `Dashboard` tab, which would allow us to configure our active scan. This time, we will select the `Crawl and Audit` option, which would perform all of the above points and everything we have discussed so far.
We may also set the Crawl configurations (as we discussed earlier) and the Audit configurations. The Audit configurations enable us to select what type of vulnerabilities we want to scan (defaults to all), where the scanner would attempt inserting its payloads, in addition to many other useful configurations. Once again, we can select a configuration preset with the `Select from library` button. For our test, as we are interested in `High` vulnerabilities that may allow us to gain control over the backend server, we will select the `Audit checks - critical issues only` option. Finally, we may add login details, as we previously saw with the Crawl configurations.
Once we select our configurations, we can click on the `Ok` button to start the scan, and the active scan task should be added in the `Tasks` pane in the `Dashboard` tab:

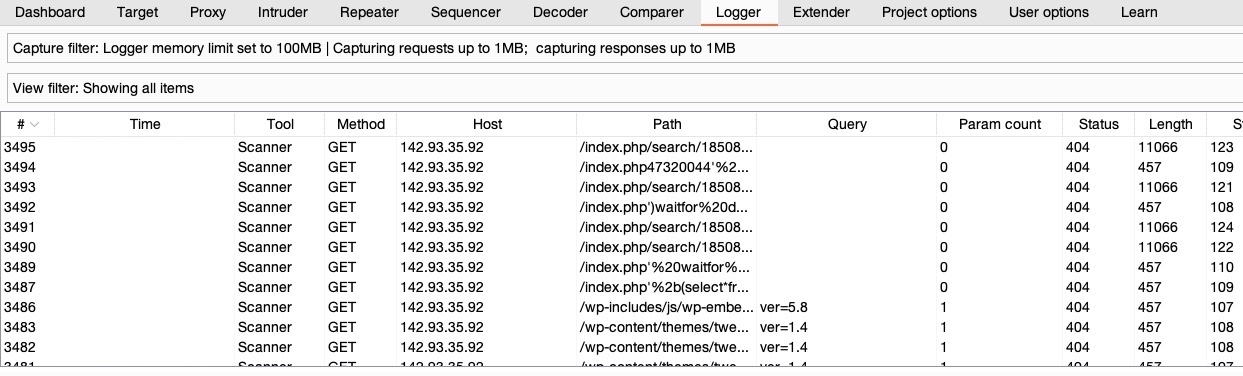
The scan will run all of the steps mentioned above, which is why it will take significantly longer to finish than our earlier scans depending on the configurations we selected. As the scan is running, we can view the various requests it is making by clicking on the `View details` button and selecting the `Logger` tab, or by going to the `Logger` tab in Burp, which shows all requests that went through or were made by Burp:
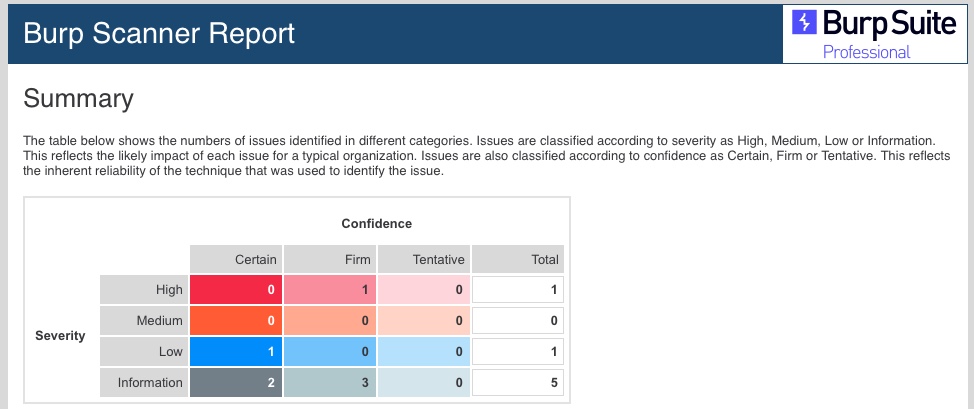
Once the scan is done, we can look at the `Issue activity` pane in the `Dashboard` tab to view and filter all of the issues identified so far. From the filter above the results, let's select `High` and `Certain` and see our filtered results:

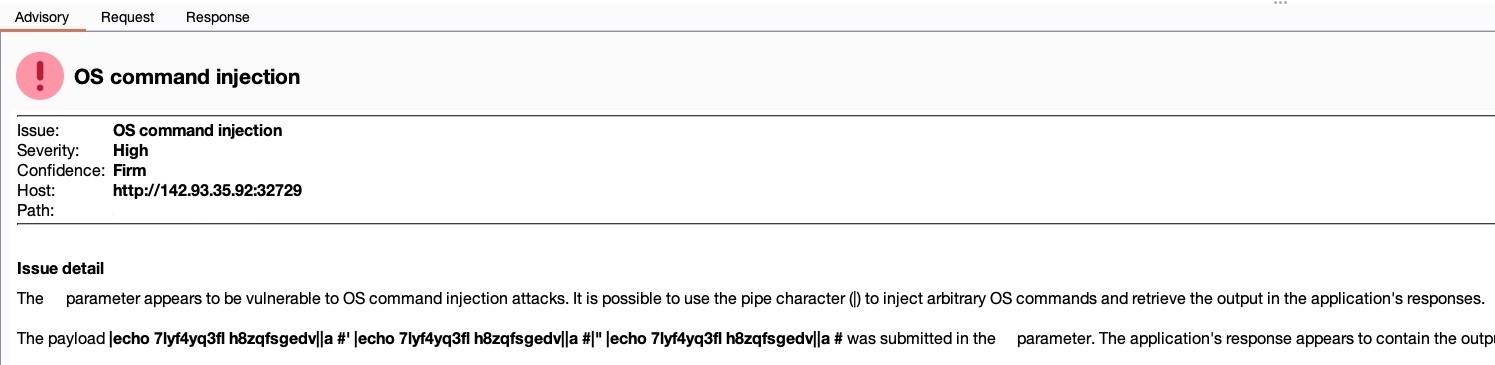
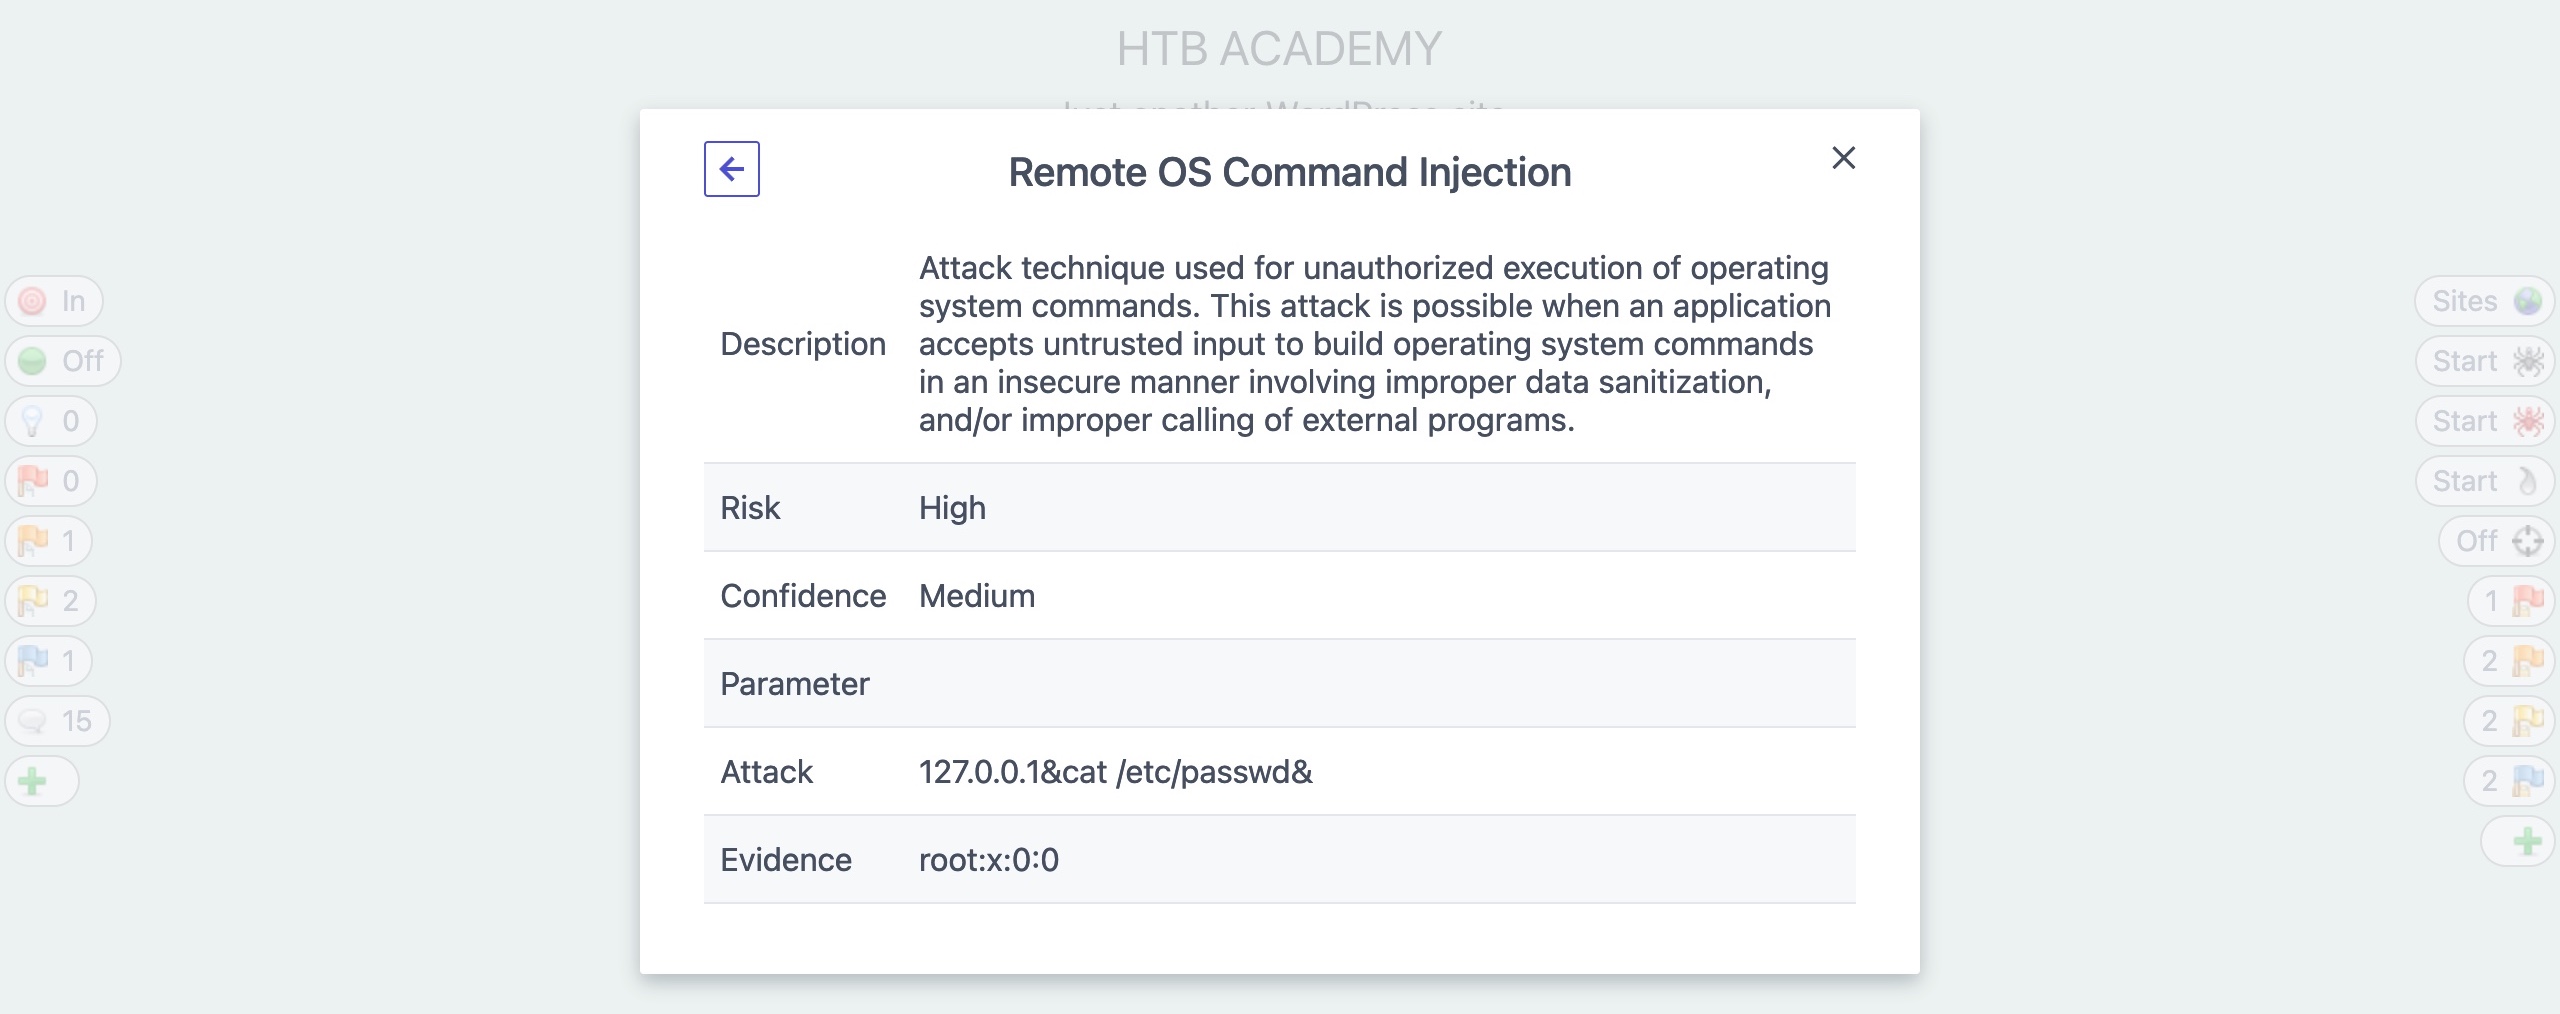
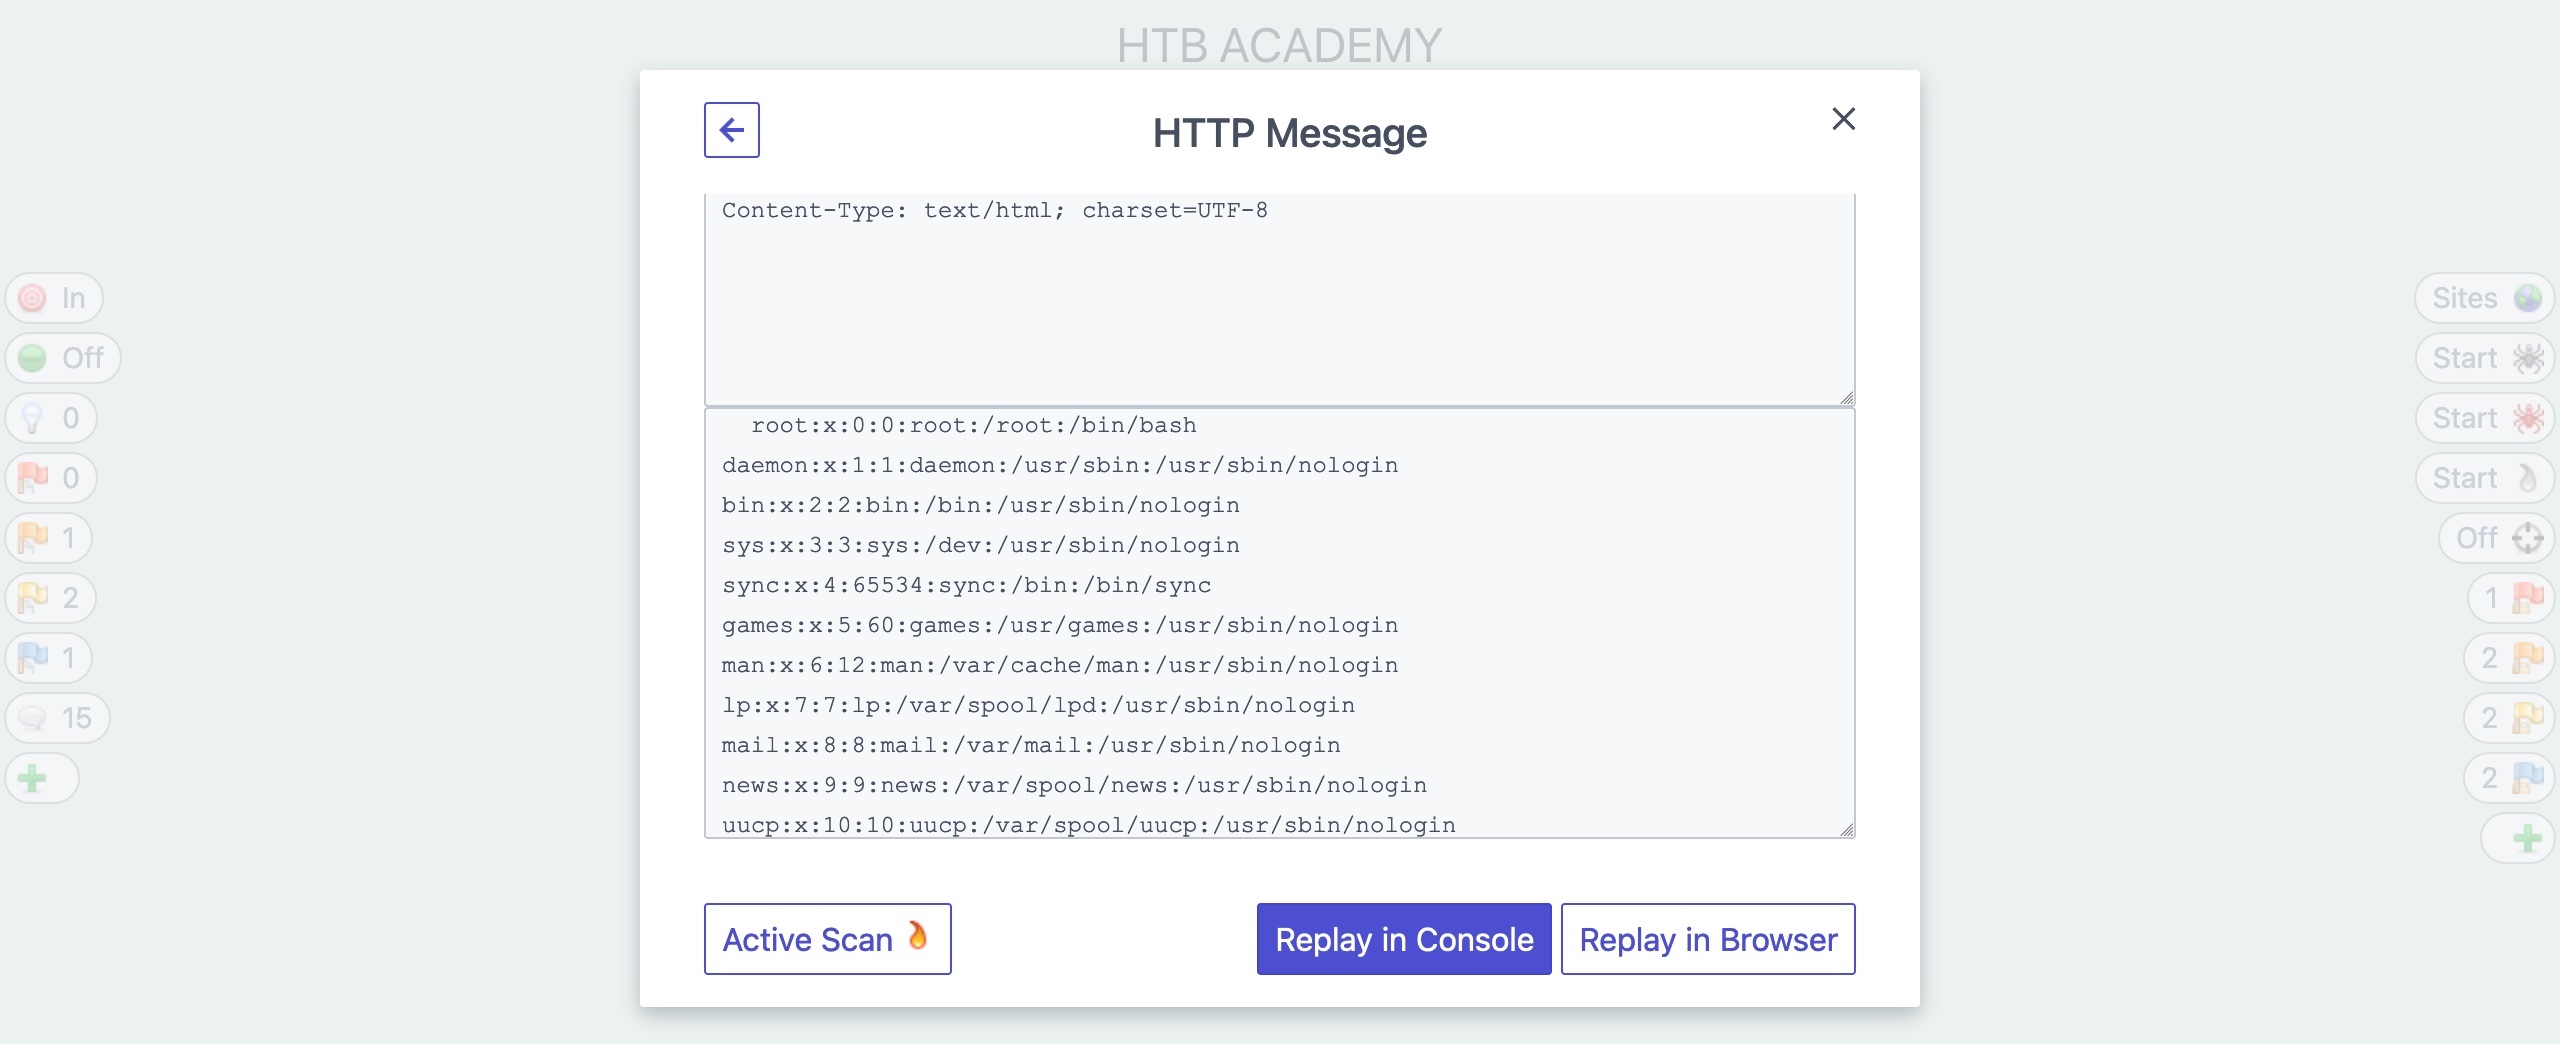
We see that Burp identified an `OS command injection` vulnerability, which is ranked with a `High` severity and `Firm` confidence. As Burp is firmly confident that this severe vulnerability exists, we can read about it by clicking on it and reading the advisory shown and view the sent request and received response, to be able to know whether the vulnerability can be exploited or how it poses a threat on the webserver:
***
### Reporting
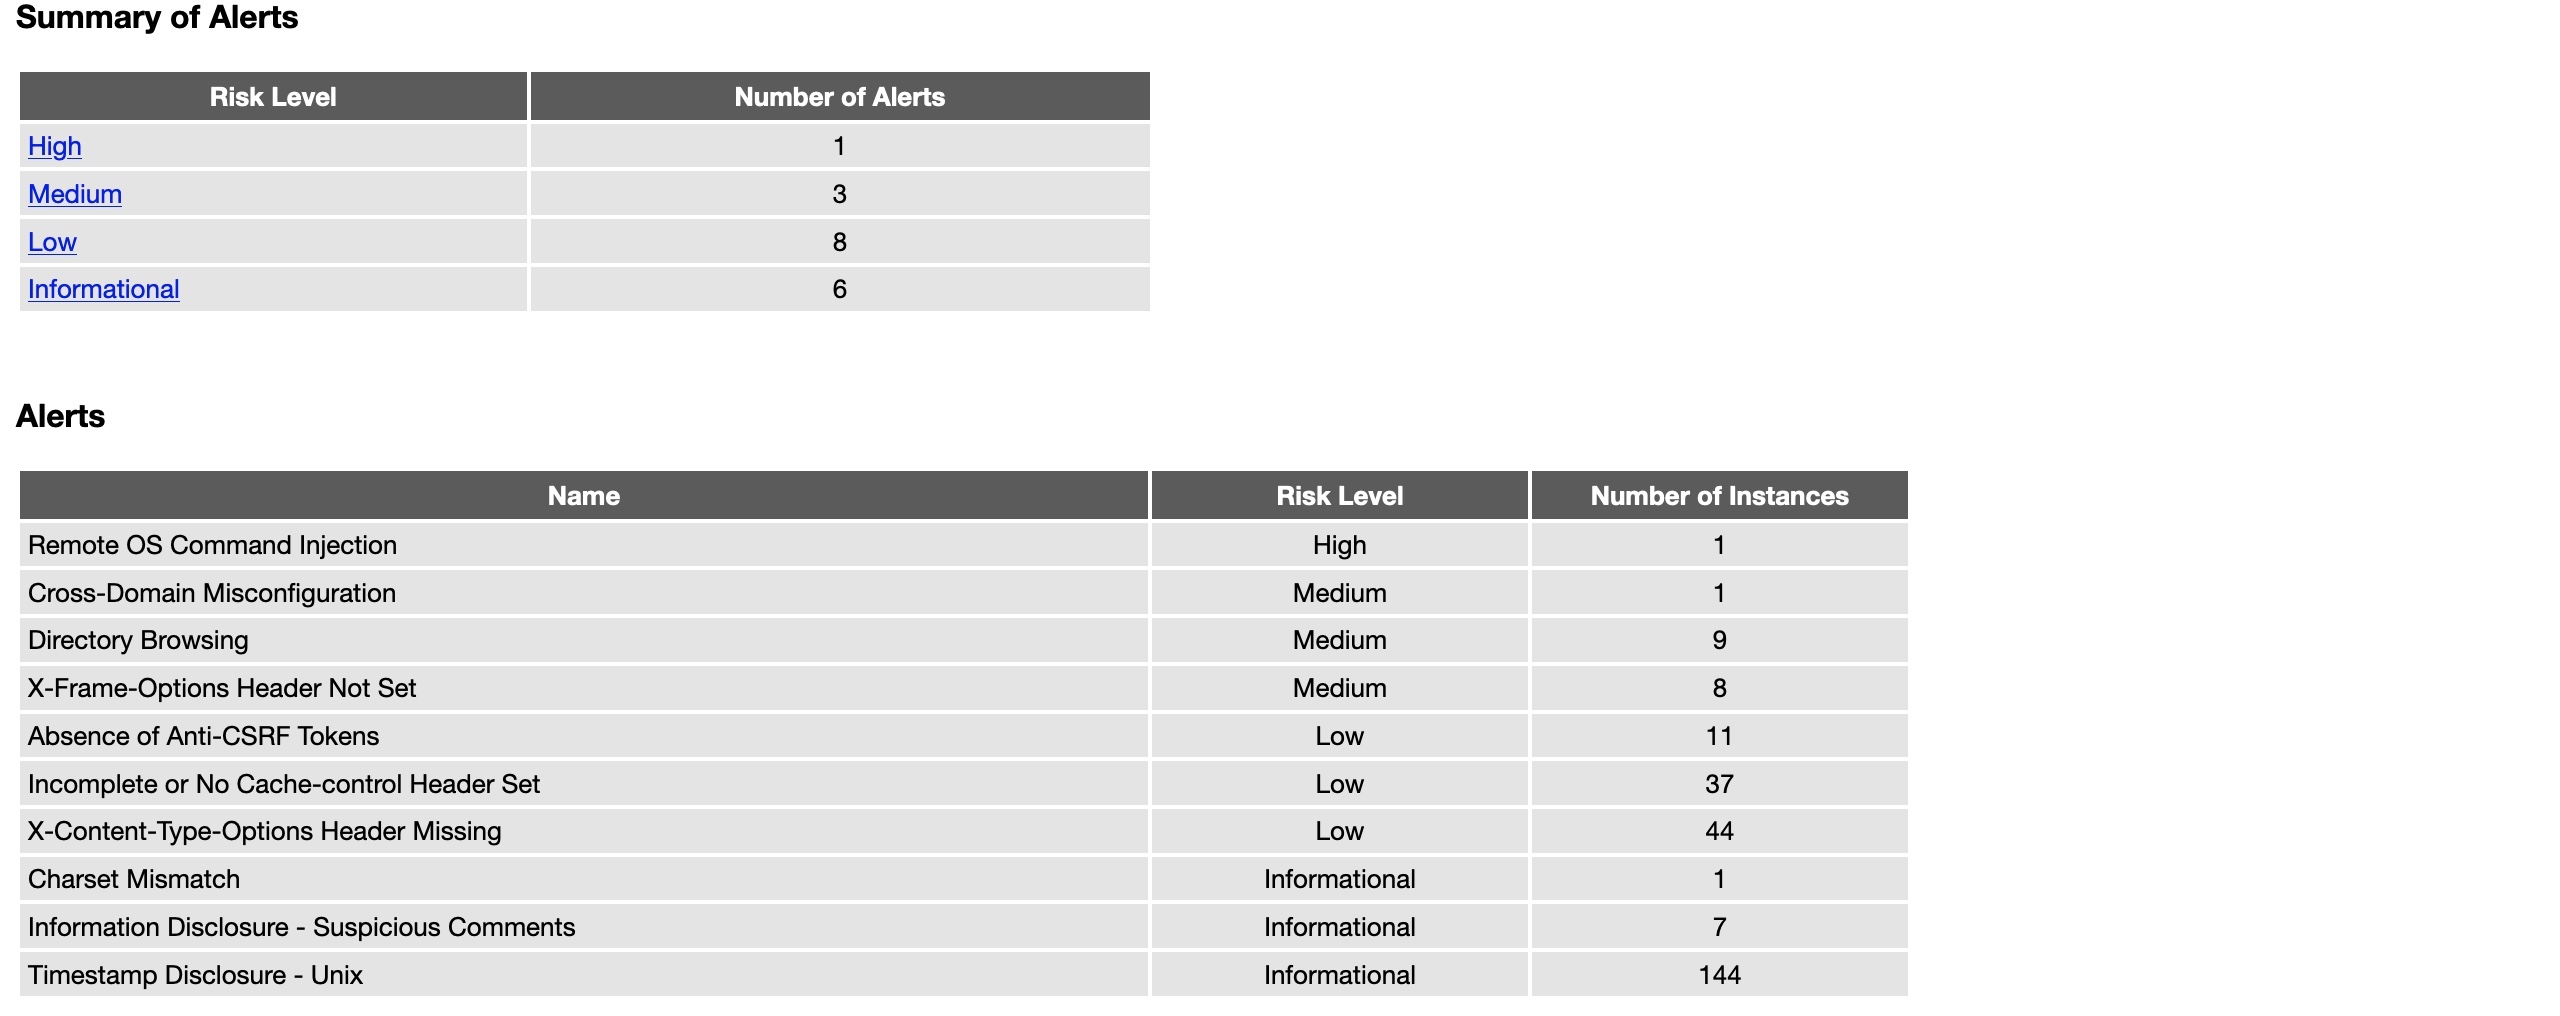
Finally, once all of our scans are completed, and all potential issues have been identified, we can go to (`Target>Site map`), right-click on our target, and select (`Issue>Report issues for this host`). We will get prompted to select the export type for the report and what information we would like to include in the report. Once we export the report, we can open it in any web browser to view its details:
As we can see, Burp's report is very organized and can be customized to only include select issues by severity/confidence. It also shows proof-of-concept details of how to exploit the vulnerability and information on how to remediate it. These reports may be used as supplementary data for the detailed reports that we prepare for our clients or the web application developers when performing a web penetration test or can be stored for our future reference. We should never merely export a report from any penetration tool and submit it to a client as the final deliverable. Instead, the reports and data generated by tools can be helpful as appendix data for clients who may need the raw scan data for remediation efforts or to import into a tracking dashboard.
## ZAP Scanner
***
ZAP also comes bundled with a Web Scanner similar to Burp Scanner. ZAP Scanner is capable of building site maps using ZAP Spider and performing both passive and active scans to look for various types of vulnerabilities.
***
### Spider
Let's start with `ZAP Spider`, which is similar to the Crawler feature in Burp. To start a Spider scan on any website, we can locate a request from our History tab and select (`Attack>Spider`) from the right-click menu. Another option is to use the HUD in the pre-configured browser. Once we visit the page or website we want to start our Spider scan on, we can click on the second button on the right pane (`Spider Start`), which would prompt us to start the scan:
Note: When we click on the Spider button, ZAP may tell us that the current website is not in our scope, and will ask us to automatically add it to the scope before starting the scan, to which we can say 'Yes'. The Scope is the set of URLs ZAP will test if we start a generic scan, and it can be customized by us to scan multiple websites and URLs. Try to add multiple targets to the scope to see how the scan would run differently.
Once we click on `Start` on the pop-up window, our Spider scan should start spidering the website by looking for links and validating them, very similar to how Burp Crawler works. We can see the progress of the spider scan both in the HUD on the `Spider` button or in the main ZAP UI, which should automatically switch to the current Spider tab to show the progress and sent requests. When our scan is complete, we can check the Sites tab on the main ZAP UI, or we can click on the first button on the right pane (`Sites Tree`), which should show us an expandable tree-list view of all identified websites and their sub-directories: 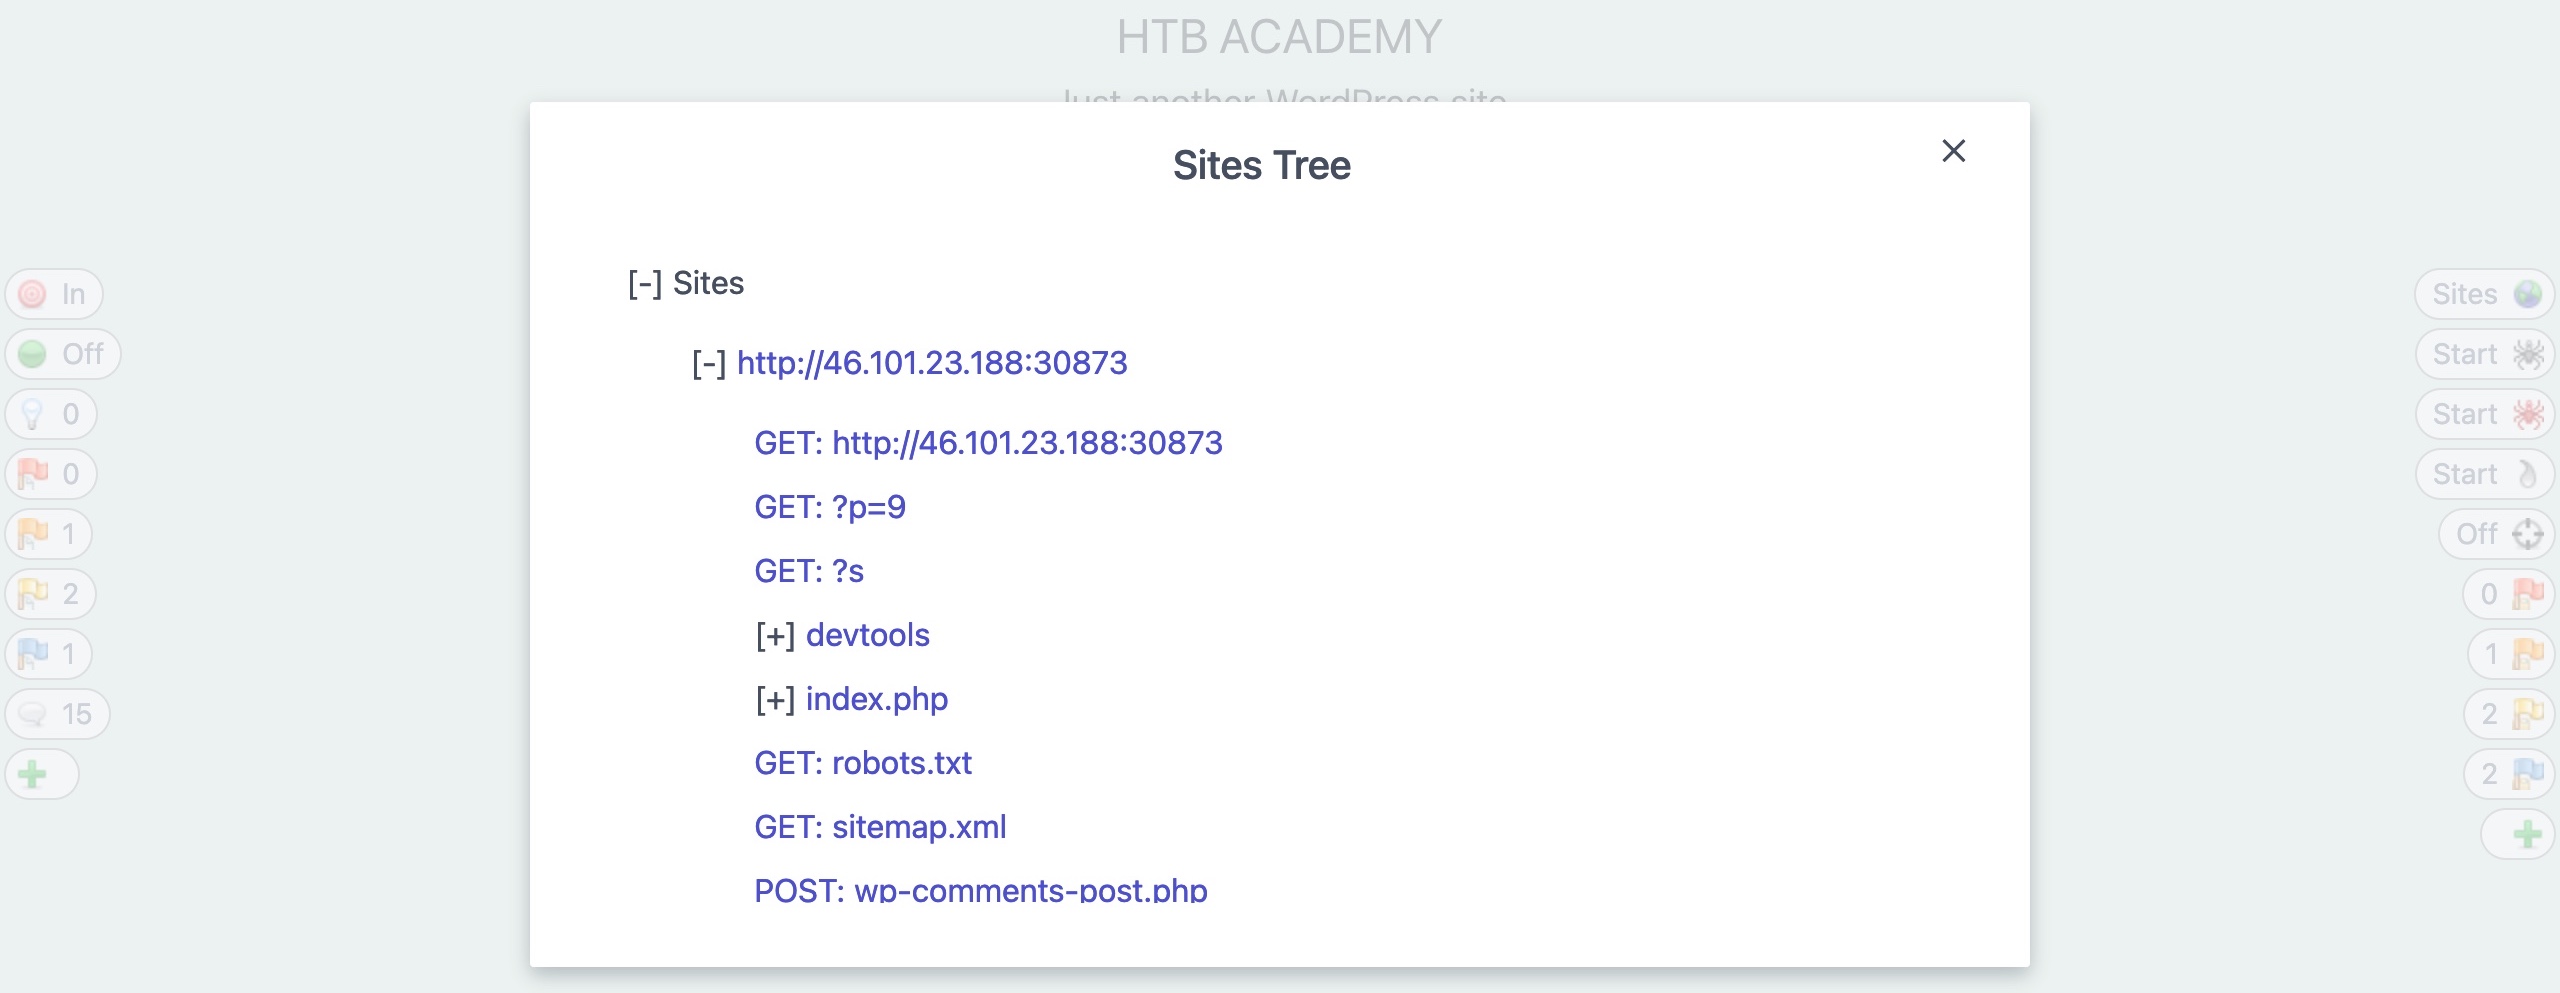
Tip: ZAP also has a different type of Spider called `Ajax Spider`, which can be started from the third button on the right pane. The difference between this and the normal scanner is that Ajax Spider also tries to identify links requested through JavaScript AJAX requests, which may be running on the page even after it loads. Try running it after the normal Spider finishes its scan, as this may give a better output and add a few links the normal Spider may have missed, though it may take a little bit longer to finish.
***
### Passive Scanner
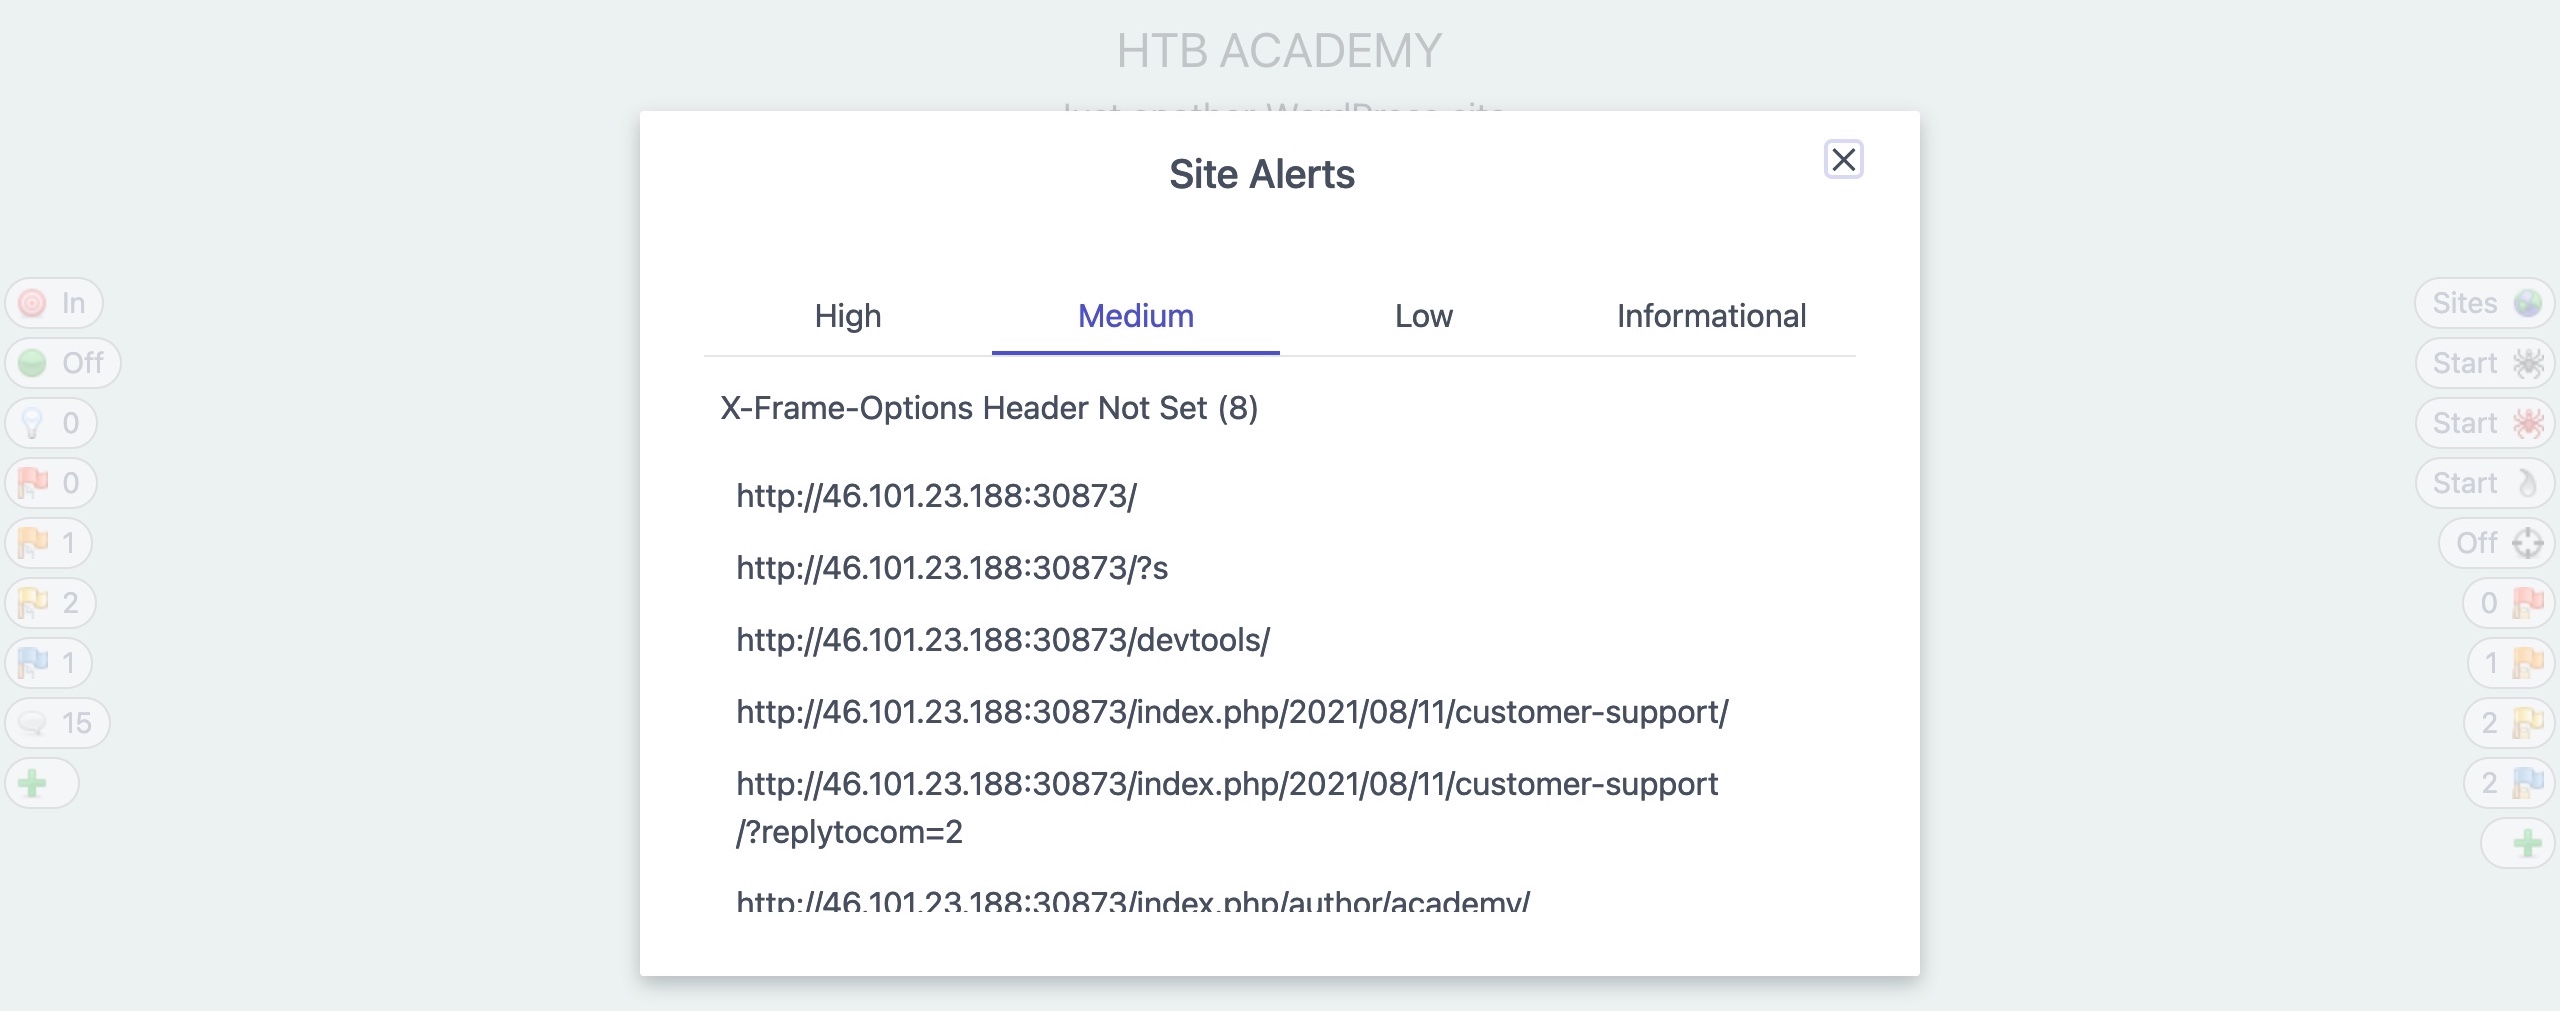
As ZAP Spider runs and makes requests to various end-points, it is automatically running its passive scanner on each response to see if it can identify potential issues from the source code, like missing security headers or DOM-based XSS vulnerabilities. This is why even before running the Active Scanner, we may see the alerts button start to get populated with a few identified issues. The alerts on the left pane shows us issues identified in the current page we are visiting, while the right pane shows us the overall alerts on this web application, which includes alerts found on other pages:
We can also check the `Alerts` tab on the main ZAP UI to see all identified issues. If we click on any alert, ZAP will show us its details and the pages it was found on:
***
### Active Scanner
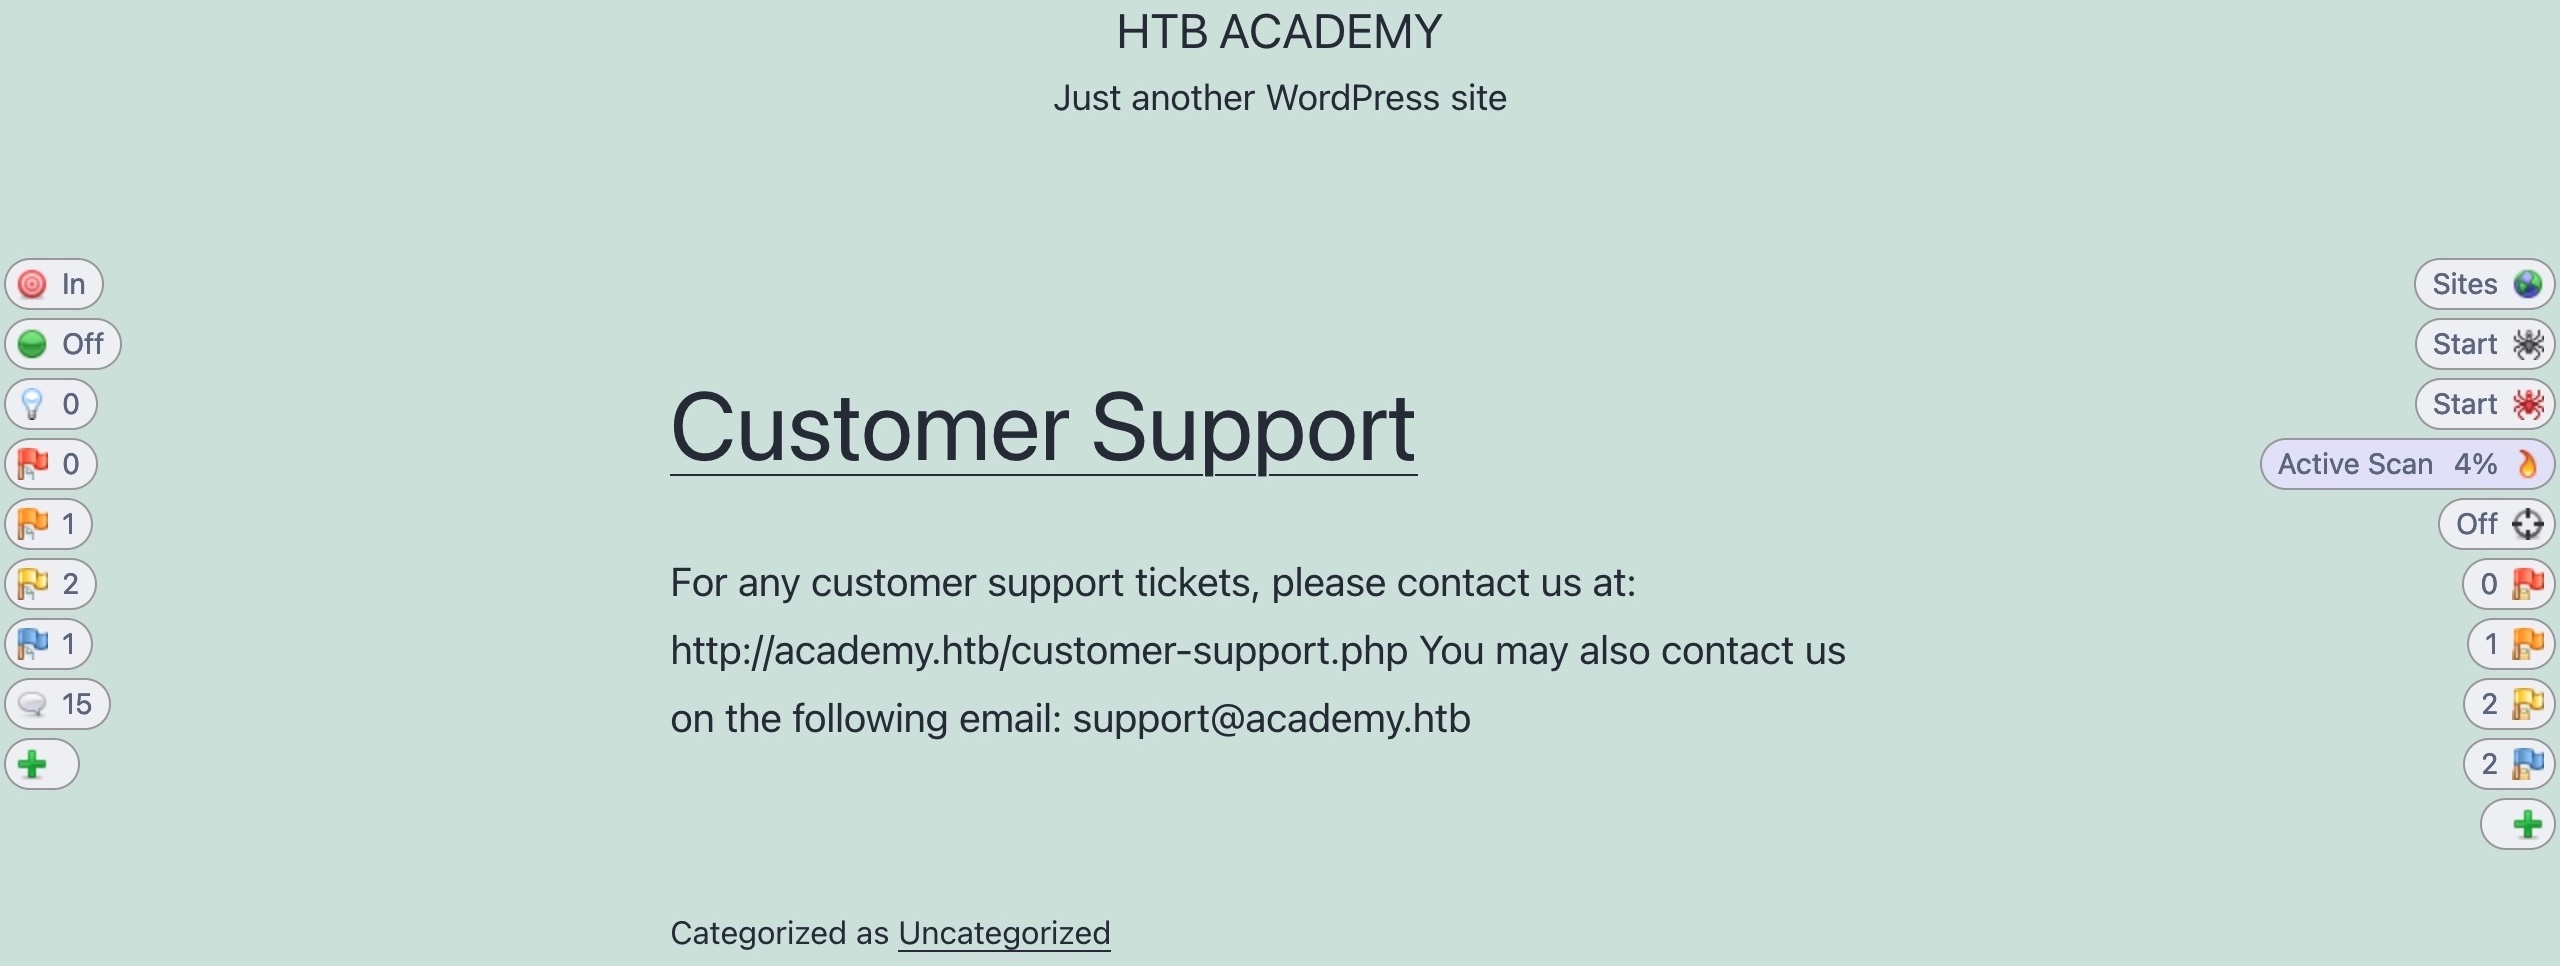
Once our site's tree is populated, we can click on the `Active Scan` button on the right pane to start an active scan on all identified pages. If we have not yet run a Spider Scan on the web application, ZAP will automatically run it to build a site tree as a scan target. Once the Active Scan starts, we can see its progress similarly to how we did with the Spider Scan:
The Active Scanner will try various types of attacks against all identified pages and HTTP parameters to identify as many vulnerabilities as it can. This is why the Active Scanner will take longer to complete. As the Active Scan runs, we will see the alerts button start to get populated with more alerts as ZAP uncovers more issues. Furthermore, we can check the main ZAP UI for more details on the running scan and can view the various requests sent by ZAP:

Once the Active Scan finishes, we can view the alerts to see which ones to follow up on. While all alerts should be reported and taken into consideration, the `High` alerts are the ones that usually lead to directly compromising the web application or the back-end server. If we click on the `High Alerts` button, it will show us the identified High Alert: 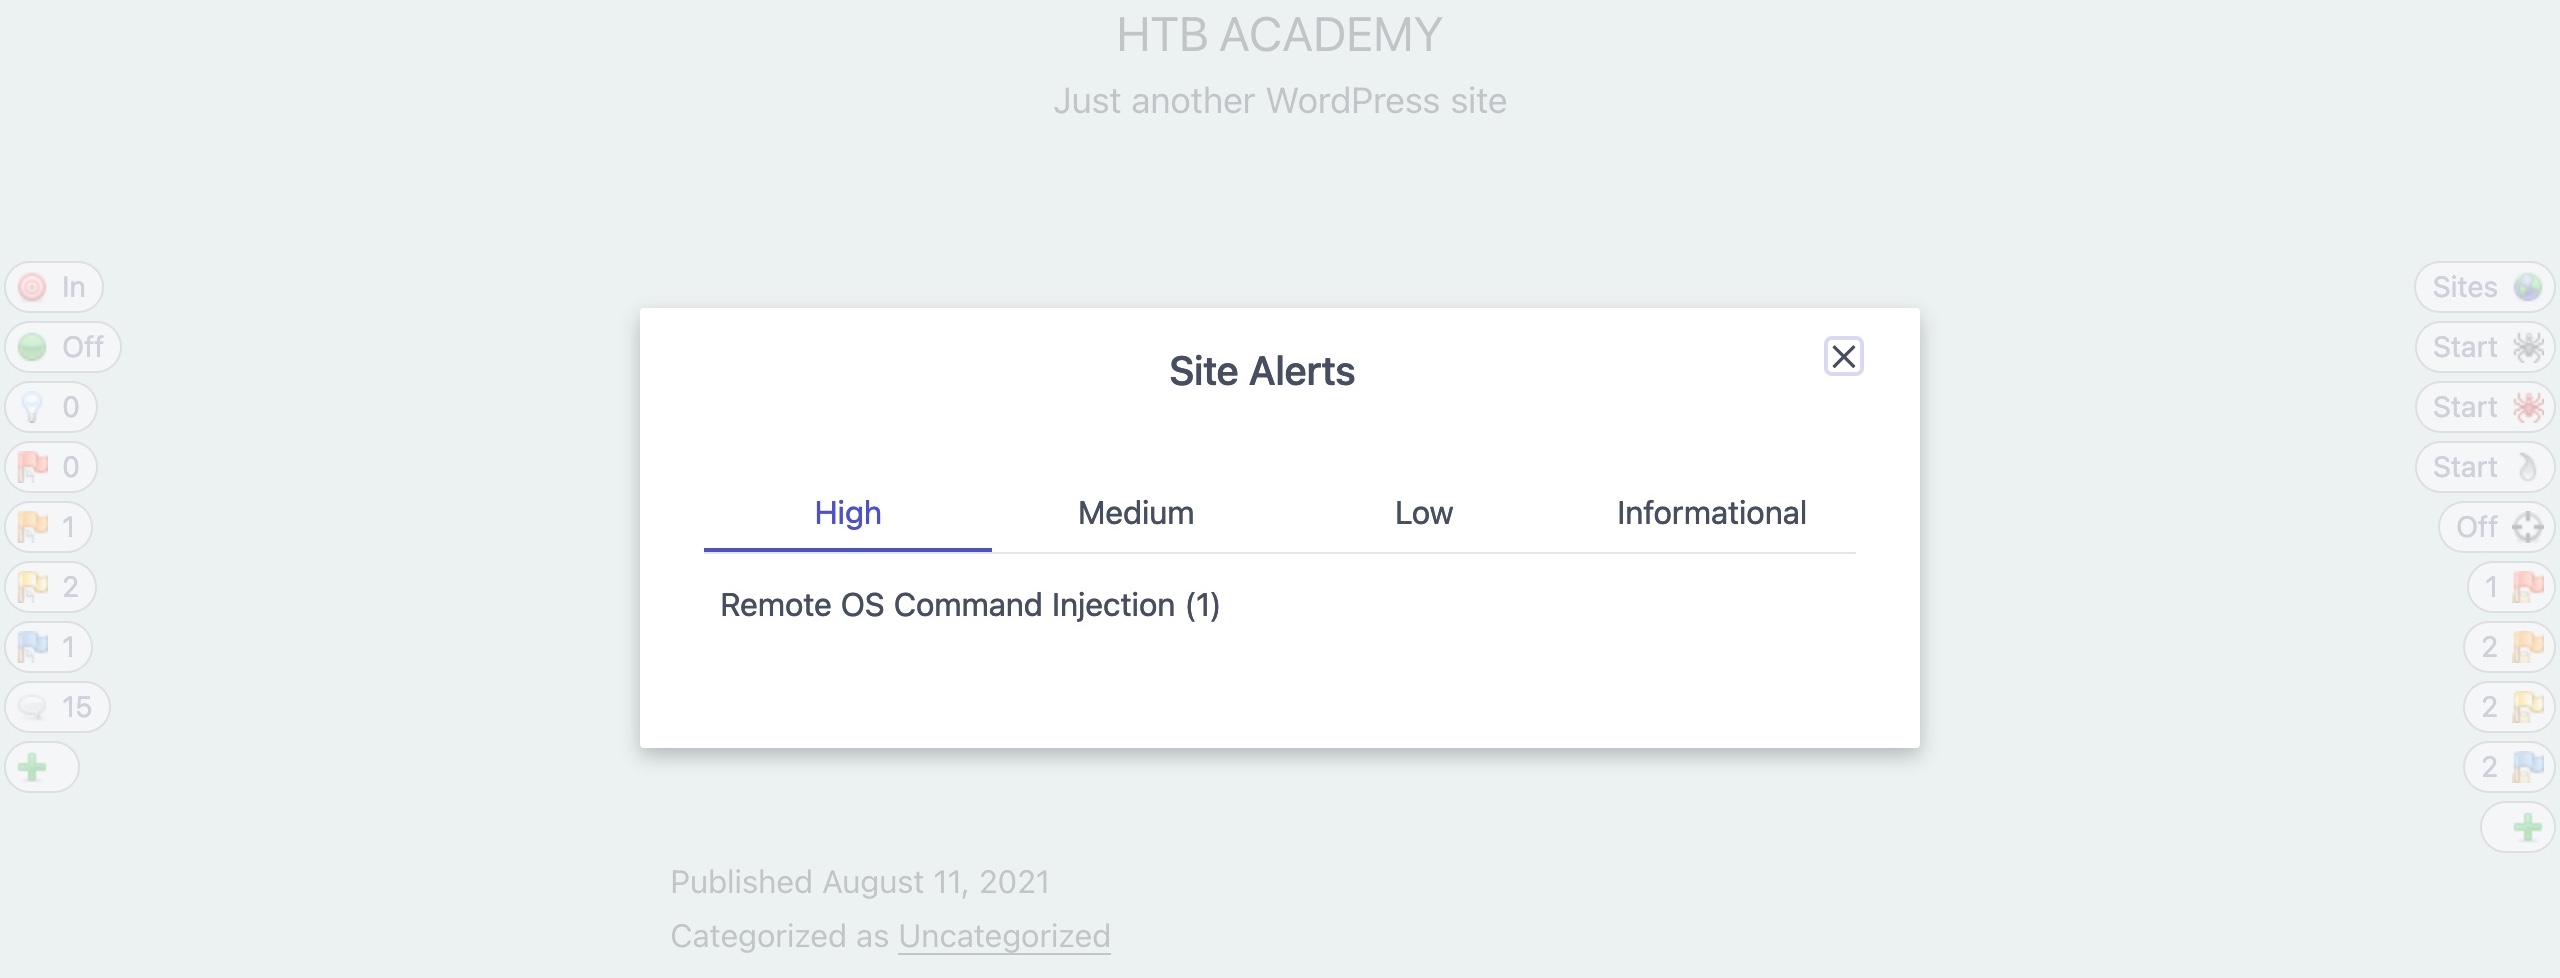
We can also click on it to see more details about it and see how we may replicate and patch this vulnerability:
In the alert details window, we can also click on the URL to see the request and response details that ZAP used to identify this vulnerability, and we may also repeat the request through ZAP HUD or ZAP Request Editor:
***
### Reporting
Finally, we can generate a report with all of the findings identified by ZAP through its various scans. To do so, we can select (`Report>Generate HTML Report`) from the top bar, which would prompt us for the save location to save the report. We may also export the report in other formats like `XML` or `Markdown`. Once we generate our report, we can open it in any browser to view it:
As we can see, the report shows all identified details in an organized manner, which may be helpful to keep as a log for various web applications we run our scans on during a penetration test.
## Extensions
***
Both Burp and ZAP have extension capabilities, such that the community of Burp users can develop extensions for Burp for everyone to use. Such extensions can perform specific actions on any captured requests, for example, or add new features, like decoding and beautifying code. Burp allows extensibility through its `Extender` feature and its [BApp Store](https://portswigger.net/bappstore), while ZAP has its [ZAP Marketplace](https://www.zaproxy.org/addons/) to install new plugins.
***
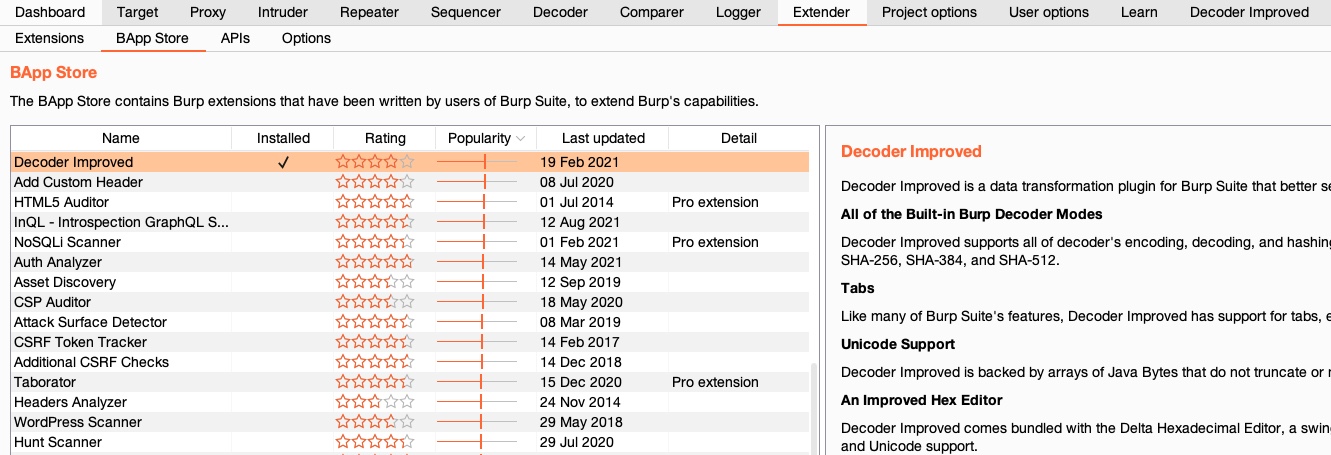
### BApp Store
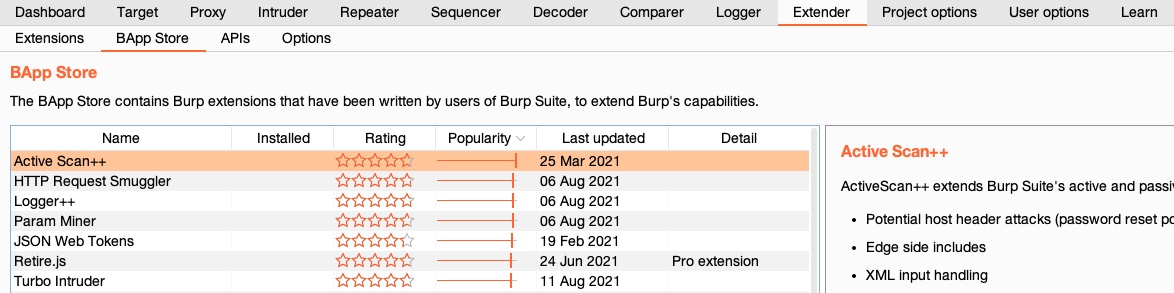
To find all available extensions, we can click on the `Extender` tab within Burp and select the `BApp Store` sub-tab. Once we do this, we will see a host of extensions. We can sort them by `Popularity` so that we know which ones users are finding most useful:
Note: Some extensions are for Pro users only, while most others are available to everyone.
We see many useful extensions, take some time to go through them and see which are most useful to you, and then try installing and testing them. Let's try installing the `Decoder Improved` extension:
Note: Some extensions have requirements that are not usually installed on Linux/macOS/Windows by default, like \`Jython\`, so you have to install them before being able to install the extension.
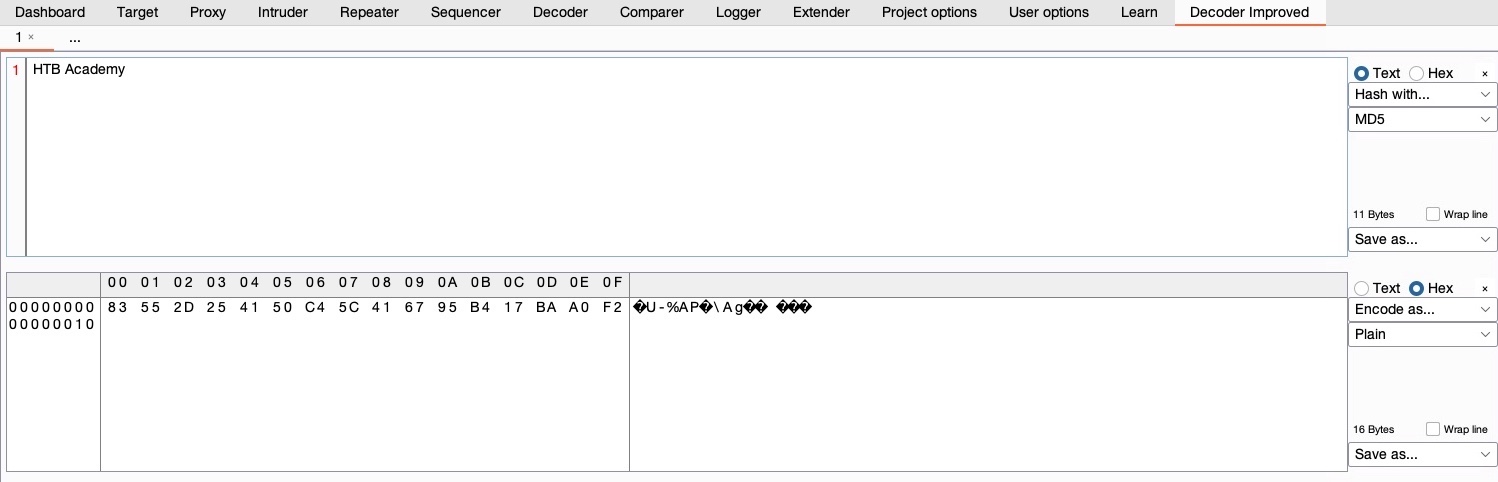
Once we install `Decoder Improved`, we will see its new tab added to Burp. Each extension has a different usage, so we may click on any extension's documentation in `BApp Store` to read more about it or visit its GitHub page for more information about its usage. We can use this extension just as we would use Burp's Decoder, with the benefit of having many additional encoders included. For example, we can input text we want to be hashed with `MD5`, and select `Hash With>MD5`:
Similarly, we can perform other types of encoding and hashing. There are many other Burp Extensions that can be utilized to further extend the functionality of Burp.
Some extensions worth checking out include, but are not limited to:
| | | |
| ---------------------------- | ------------------------- | ------------------------------ |
| .NET beautifier | J2EEScan | Software Vulnerability Scanner |
| Software Version Reporter | Active Scan++ | Additional Scanner Checks |
| AWS Security Checks | Backslash Powered Scanner | Wsdler |
| Java Deserialization Scanner | C02 | Cloud Storage Tester |
| CMS Scanner | Error Message Checks | Detect Dynamic JS |
| Headers Analyzer | HTML5 Auditor | PHP Object Injection Check |
| JavaScript Security | Retire.JS | CSP Auditor |
| Random IP Address Header | Autorize | CSRF Scanner |
| JS Link Finder | | |
***
### ZAP Marketplace
ZAP also has its own extensibility feature with the `Marketplace` that allows us to install various types of community-developed add-ons. To access ZAP's marketplace, we can click on the `Manage Add-ons` button and then select the `Marketplace` tab:

In this tab, we can see the different available add-ons for ZAP. Some add-ons may be in their `Release` build, meaning that they should be stable to be used, while others are in their `Beta/Alpha` builds, which means that they may experience some issues in their use. Let's try installing the `FuzzDB Files` and `FuzzDB Offensive` add-ons, which adds new wordlists to be used in ZAP's fuzzer: 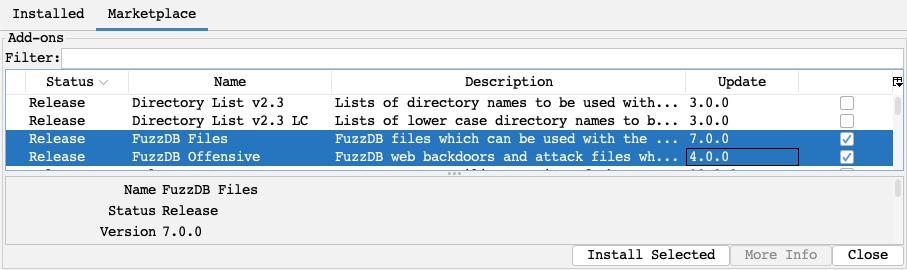
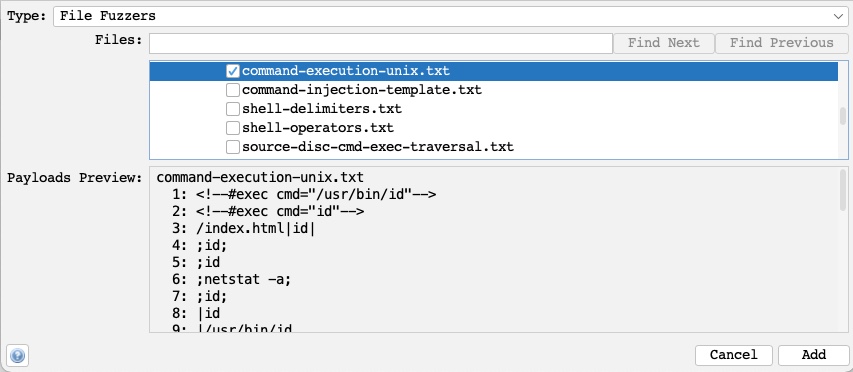
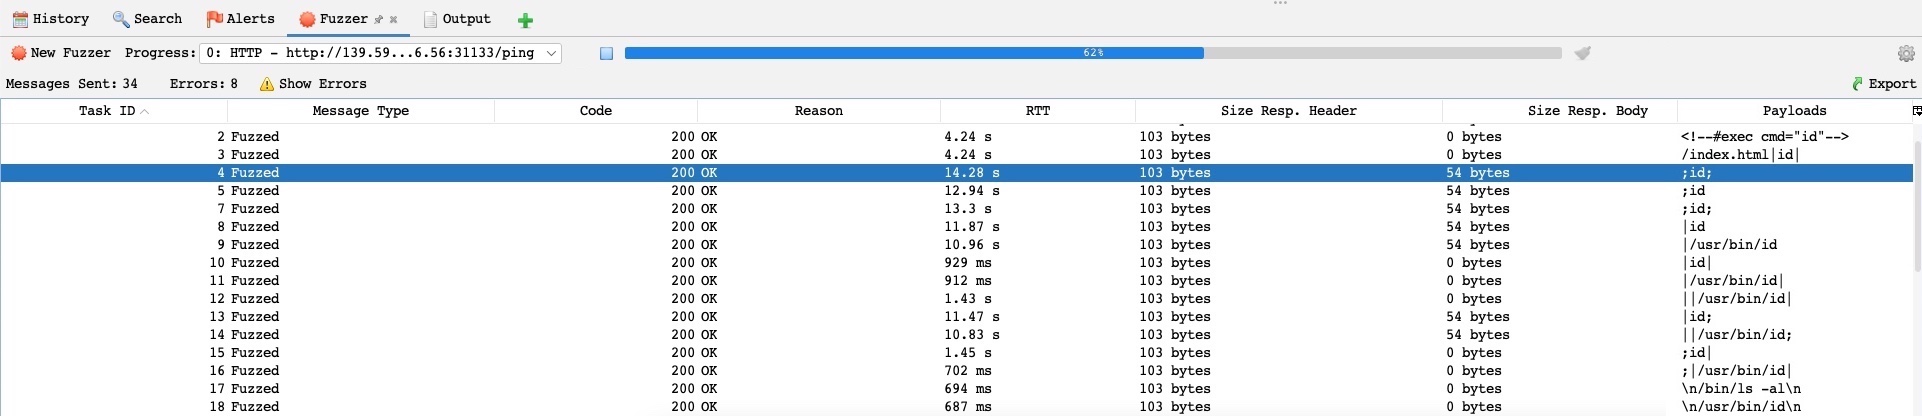
Now, we will have the option to pick from the various wordlists and payloads provided by FuzzDB when performing an attack. For example, suppose we were to perform a Command Injection fuzzing attack on one of the exercises we previously used in this module. In that case, we will see that we have more options in the `File Fuzzers` wordlists, including an OS Command Injection wordlist under (`fuzzdb>attack>os-cmd-execution`), which would be perfect for this attack:
Now, if we run the fuzzer on our exercise using the above wordlist, we will see that it was able to exploit it in various ways, which would be very helpful if we were dealing with a WAF protected web application:
Try to repeat the above with the first exercise in this module to see how add-ons can help in making your penetration test easier.